- +44 (0)7312 869921
- sargassogames@gmail.com
- Mon - Fri: 9:00 - 18:30

Menu

Tutorials are designed to give you a taste of how Zeno works. They are not a substitute for the rule book. The tutorials chart the career of a freshly qualified technician, from his induction to his promotion. Currently there are two. The third and final tutorial will explain Scenes.
Good morning Technician. Hopefully your first evening aboard the Riga was an enjoyable one. As I recall the initiation party can be a little taxing. I trust you are sufficiently recovered to resume. If you need to refresh your memory, please follow this link to repeat your Induction.
Please welcome Engineering Chief Holly Roy. Chief Roy has agreed to join this tutorial to help demonstrate how the crew work on the Riga. Holly also expressed a wish to meet you because you have been assigned exciting work which has a bearing on her department.
You will join the Damage Control team. With respect to all the hard working members of Technical division, there are few more important jobs at your grade. In an emergency you can expect to be assisted by robots and other automatic devices controlled by Engineering. However, they cannot replace the man on the spot. People will always be needed to extinguish fires, triage the wounded and venture into damaged reactors to shut them down manually. The radiation plays havoc with the robots, you see.
In exchange you will receive hazard pay during emergencies and the prospect of rapid advancement. Of all the departments in the Imperial Navy, Damage Control has the highest turnover. I told you that you would soon get on! You are already well on your way to a better place.
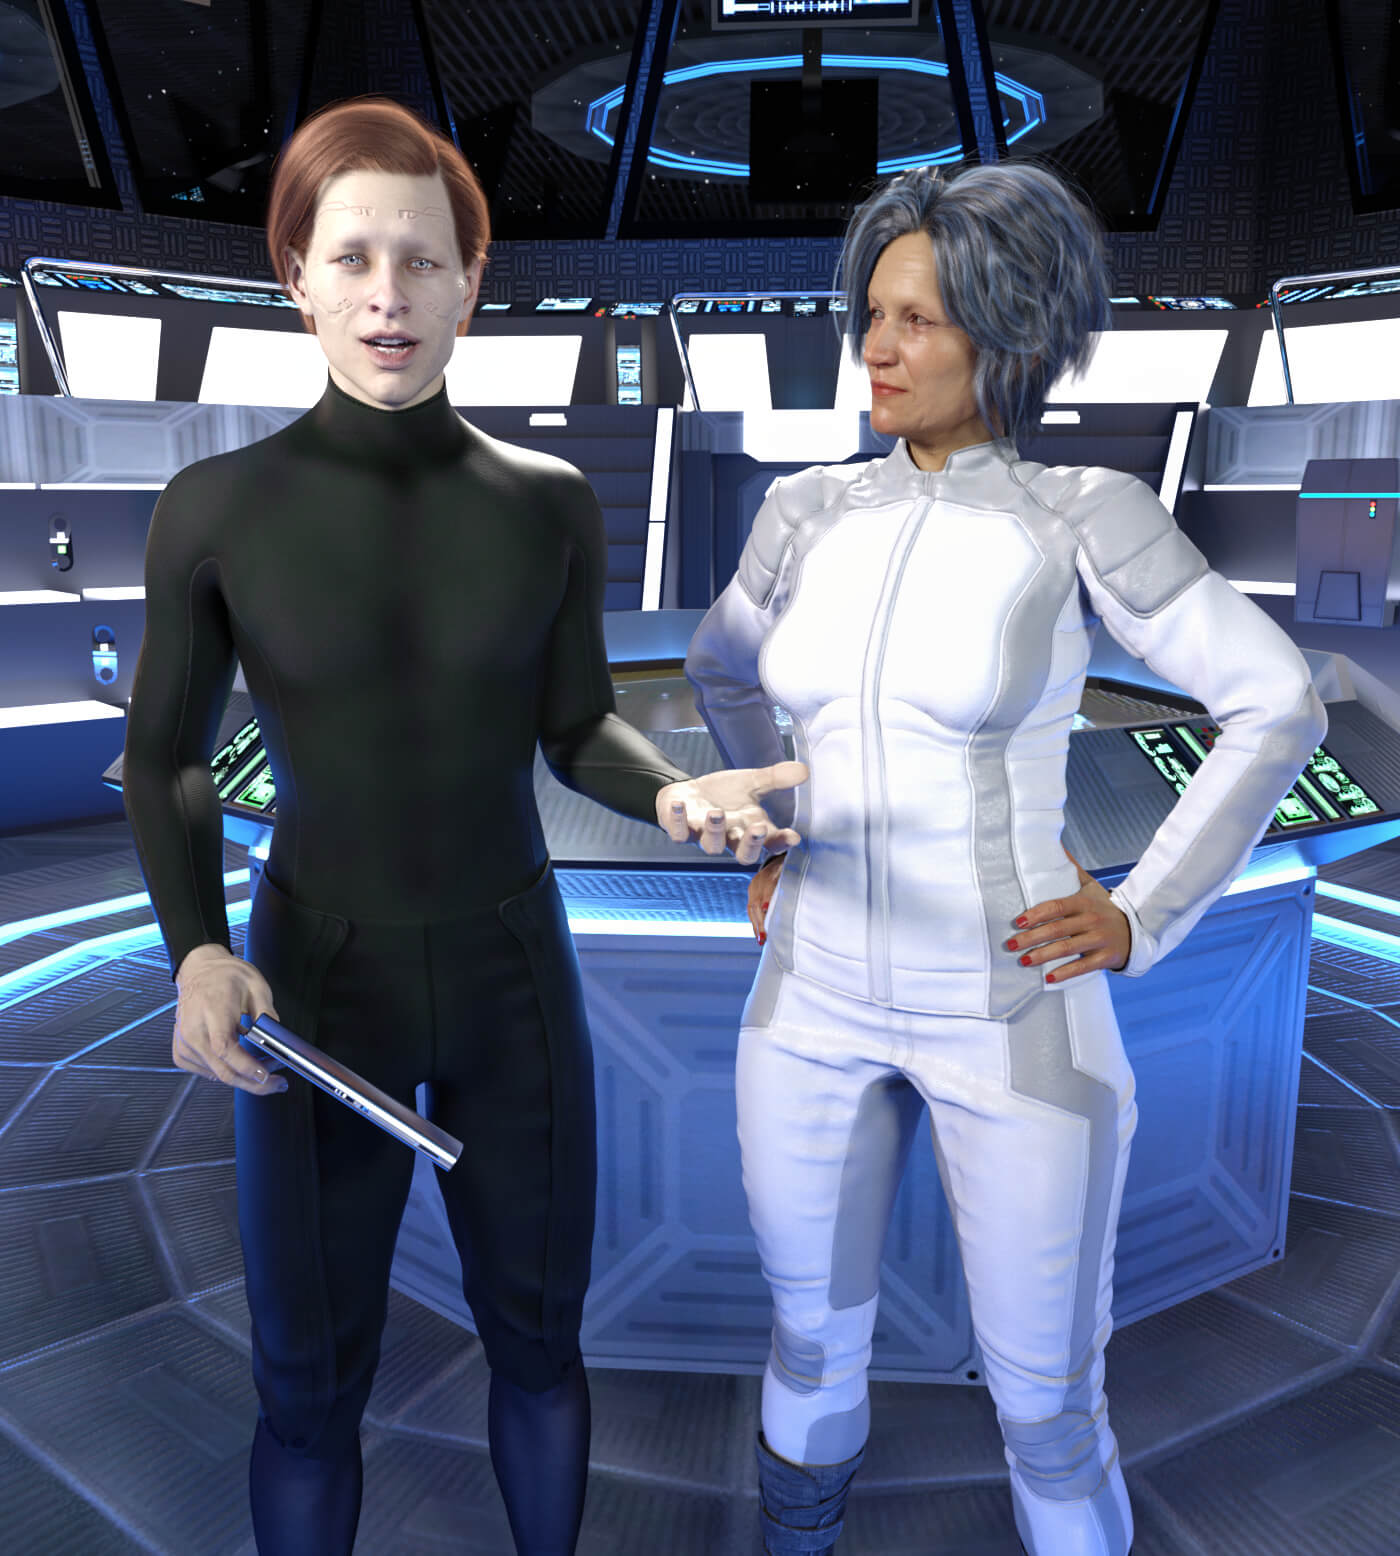
Before proceeding, we will briefly pause to discuss terminology. Your training will now focus not on crew but on survivors. Survivors are any people on the ship. In an emergency, whether they are crew, guests or prisoners, the preservation of survivors is your key responsibility.
If you are ready, let’s go to work.
Divisions


We referred briefly to Divisions in the induction, but they merit another look. There are 5 Divisions on the Riga. Each crew member is allocated to one of them, reflecting their aptitude and responsibilities. It is where they are most likely to be found on the ship.
Command staff are officers, important guests and members of high status guilds. They have access to personal cabins and the wardroom complex. Stewards attend to their needs.
Tactical comprises the military complement. In addition to rockets, an excimer laser and two short range cannons, the Riga has it’s own company of marines and two assault gunships to carry them.
Science personnel man the labs that will enable the Riga to survey unexplored worlds. They also run the medical facilities and operate some of the more demanding ship systems, such as Gravity.
Engineering division keeps the heavy equipment on the ship running, such as the main engine and the reactors. Without the expertise of Engineering, the Riga would soon run into difficulties.
Technical staff support the other divisions in a variety of ways. Many are technicians tasked with cleaning and maintaining equipment, from ventilation to vending machines. Some are stewards.
Survivors
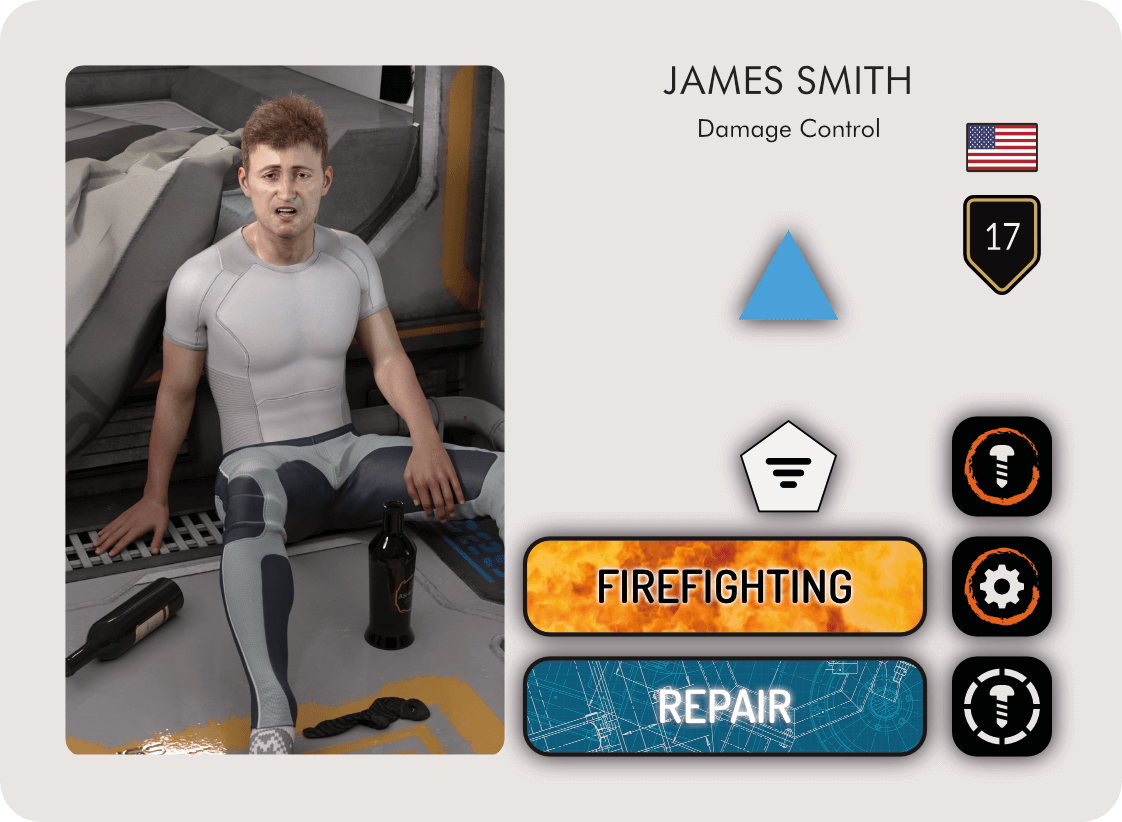
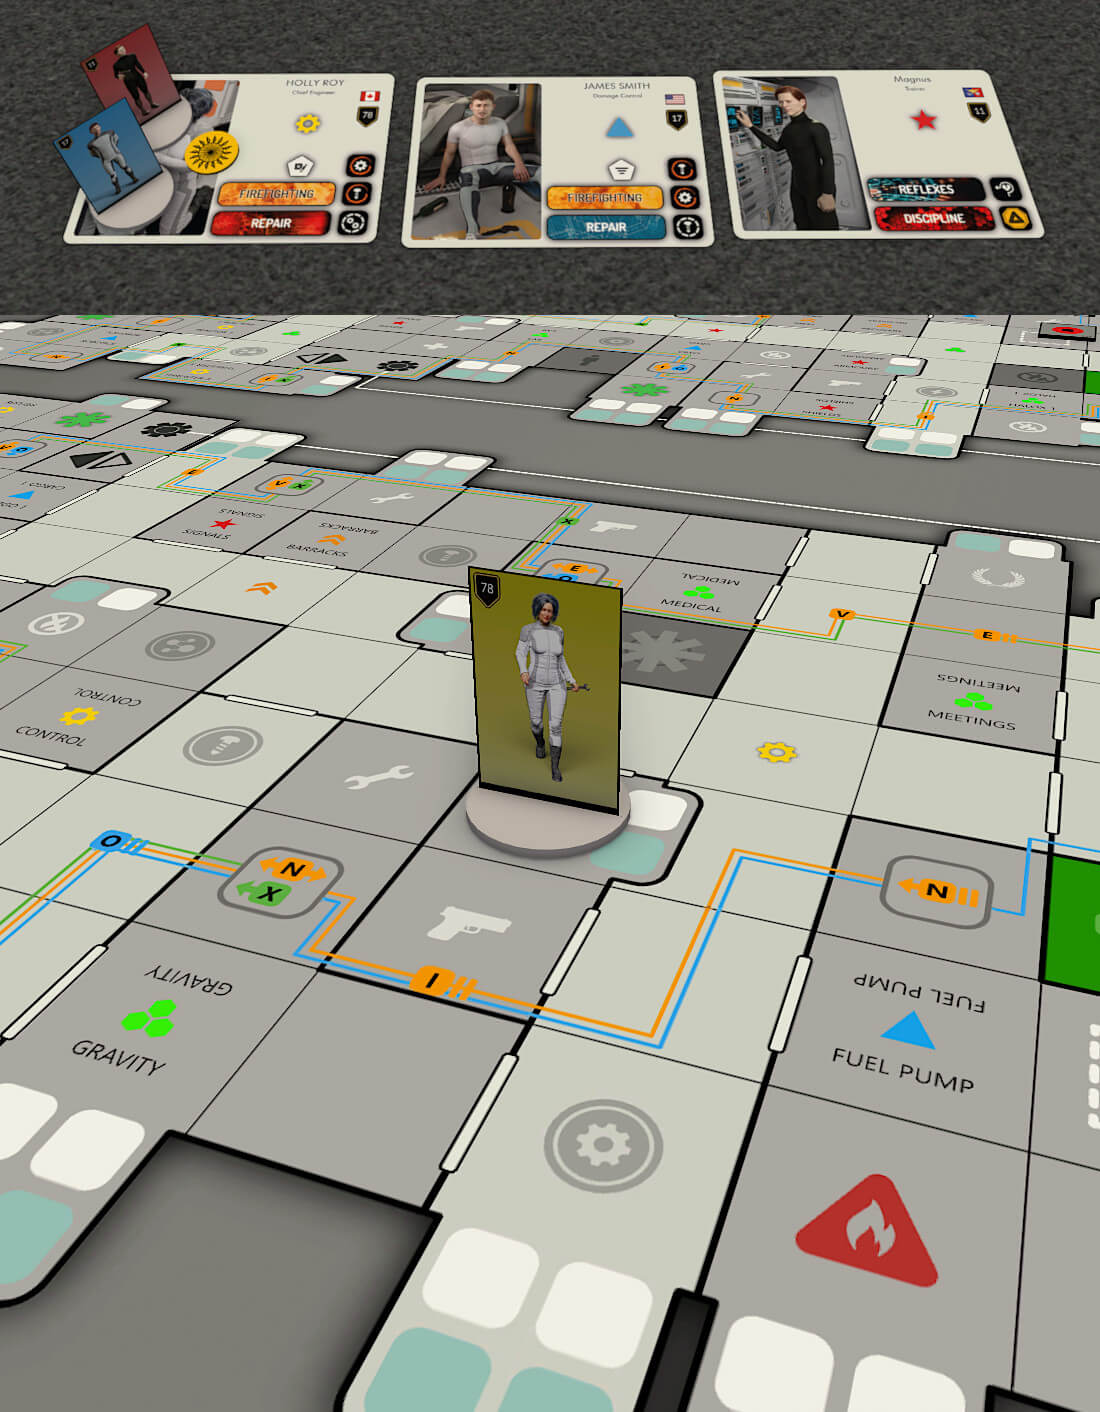
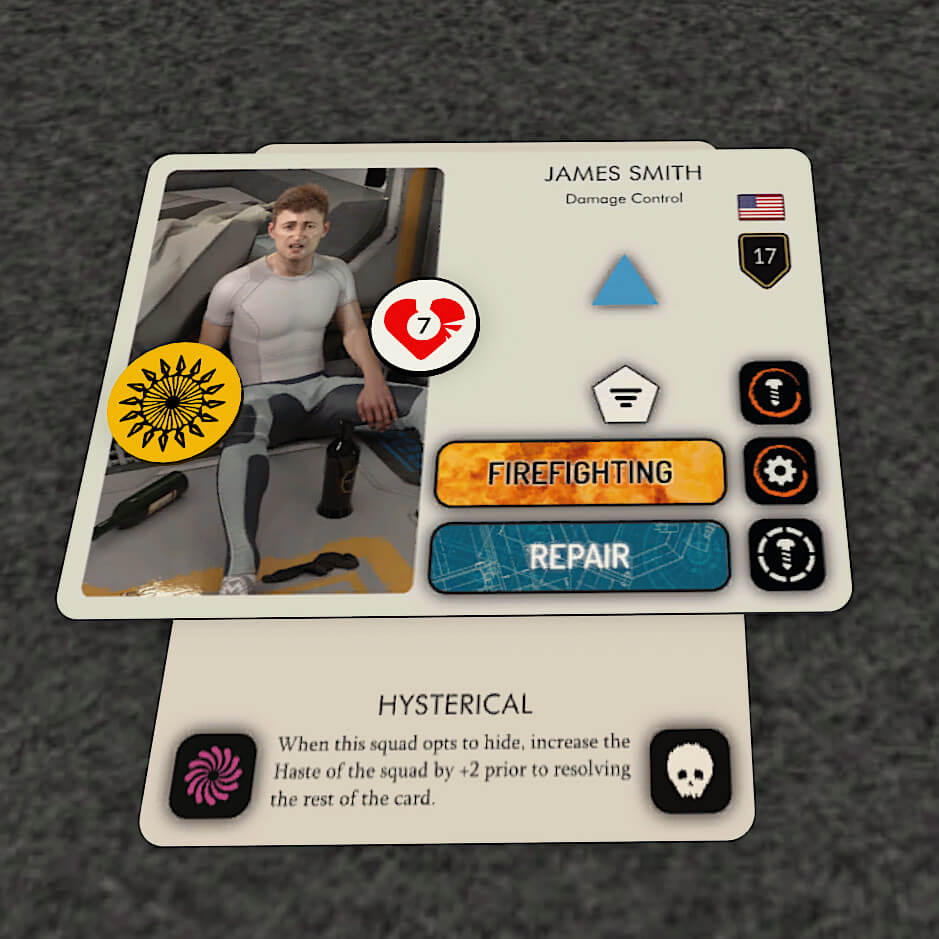
You are a Survivor. So, let us have a look at you properly. Each survivor is associated with a unique Survivor Card. Refer to the image to see yours. This card brings together all the information you are likely to need to know and combines it with a digital portrait. As you may recall I recorded yours last night after your initiation. Not all digital portraits are taken at work.
Also shown is your name, role and a flag depicting the administrative district of the Empire you hail from. Below this is your rank.
Rank reflects your position in the ship hierarchy. However, in a crisis rank is more nuanced. Some survivors are natural leaders, regardless of their official position.
Your division is prominently displayed. Beneath this is your starting baggage, affiliation and traits. We will describe Baggage shortly. Your affiliation icon is enclosed by a pentagonal border.
Survivors with a matching affiliation are personally close. When a Survivor is eliminated, any faction featuring a Survivor with a matching affiliation suffers a failure. Failures are bad.
Traits are diverse. They can be skills, bionic upgrades, personal characteristics and more. All Survivors have two main traits and some have an extra Firefighting trait. Your traits are Firefighting and Repair. You have an extra Firefighting trait too. No wonder you were picked for Damage Control.
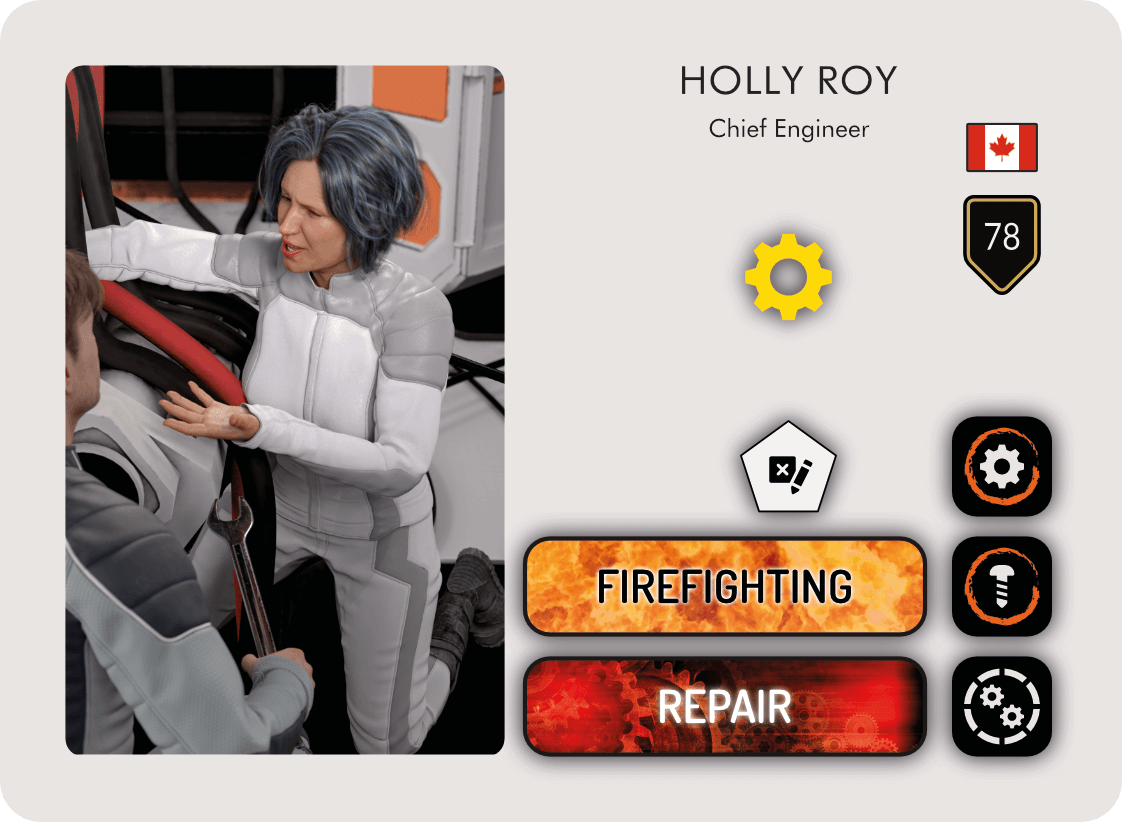
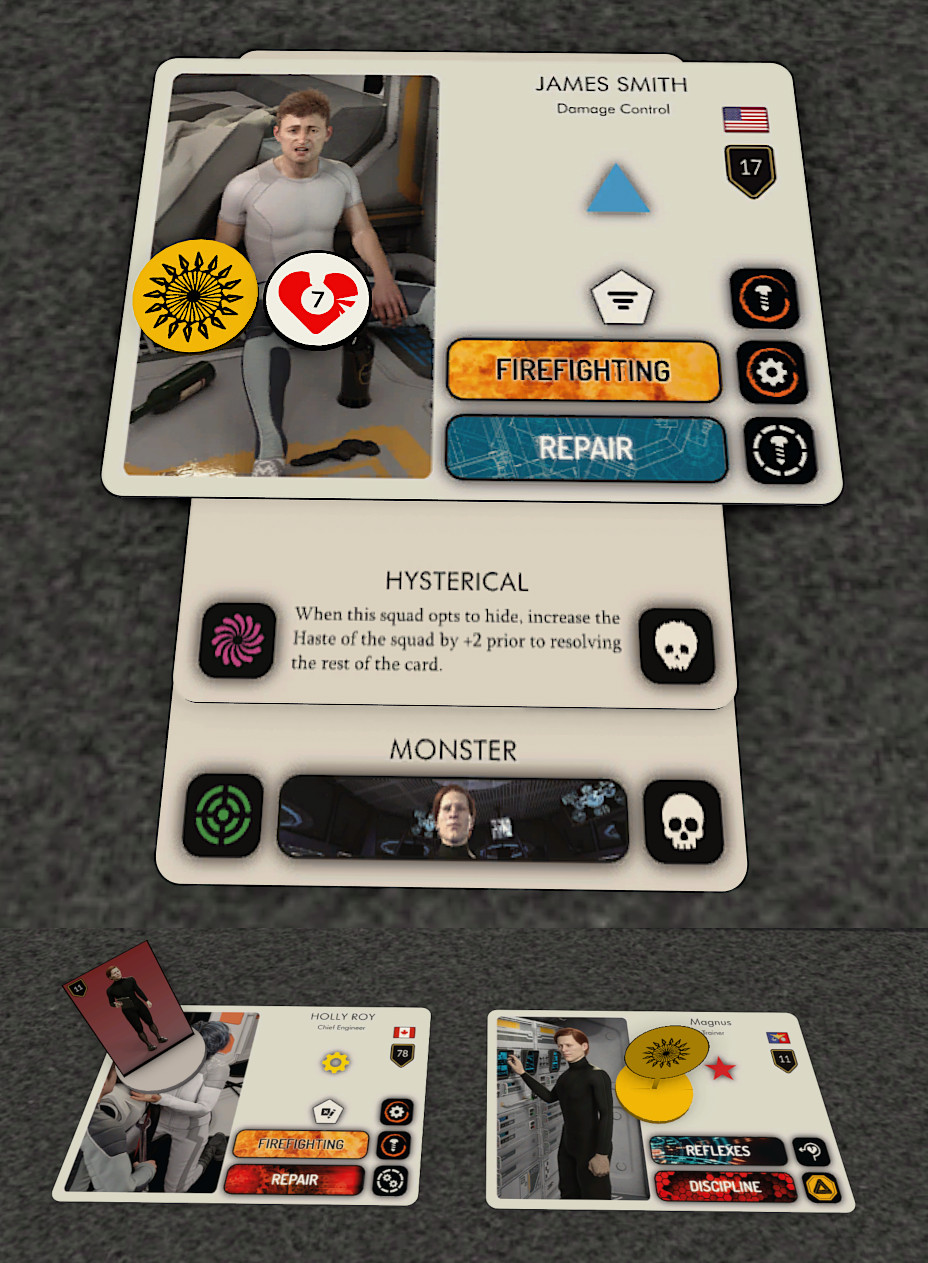
Also displayed is Holly’s Survivor Card. As you can see, she has similar traits to you. Her affiliation is different, as of course are her personal details.
Factions
Survivors are grouped into factions. You can think of a faction as a team. Each faction is associated with a unique icon and any tokens belonging to that faction display it. However, factions have no special abilities. What a faction can or cannot do depends on the survivors belonging to it.
We are going to make a faction now, consisting of you, Chief Roy and myself. A faction does not need to have a lot of survivors. In fact, it can temporarily have none. However, it will never have none for long. When the computer detects an empty faction it automatically wakes a replacement crew member from cryogenic sleep to join it.
Why are there crew members in cryogenic sleep? Because that is their job! Every Imperial ship has some replacement crew on ice. They don’t consume provisions or air. Meanwhile, they earn half pay and don’t age. Some have been asleep for years. Does that seem odd? If you had crippling debts or a bad family situation, you might want to escape into the future too. Let’s hope you never do!
Each faction has a Wheel. Refer to the image to see your faction’s Wheel. Your faction icon is in thr center of the Wheel.
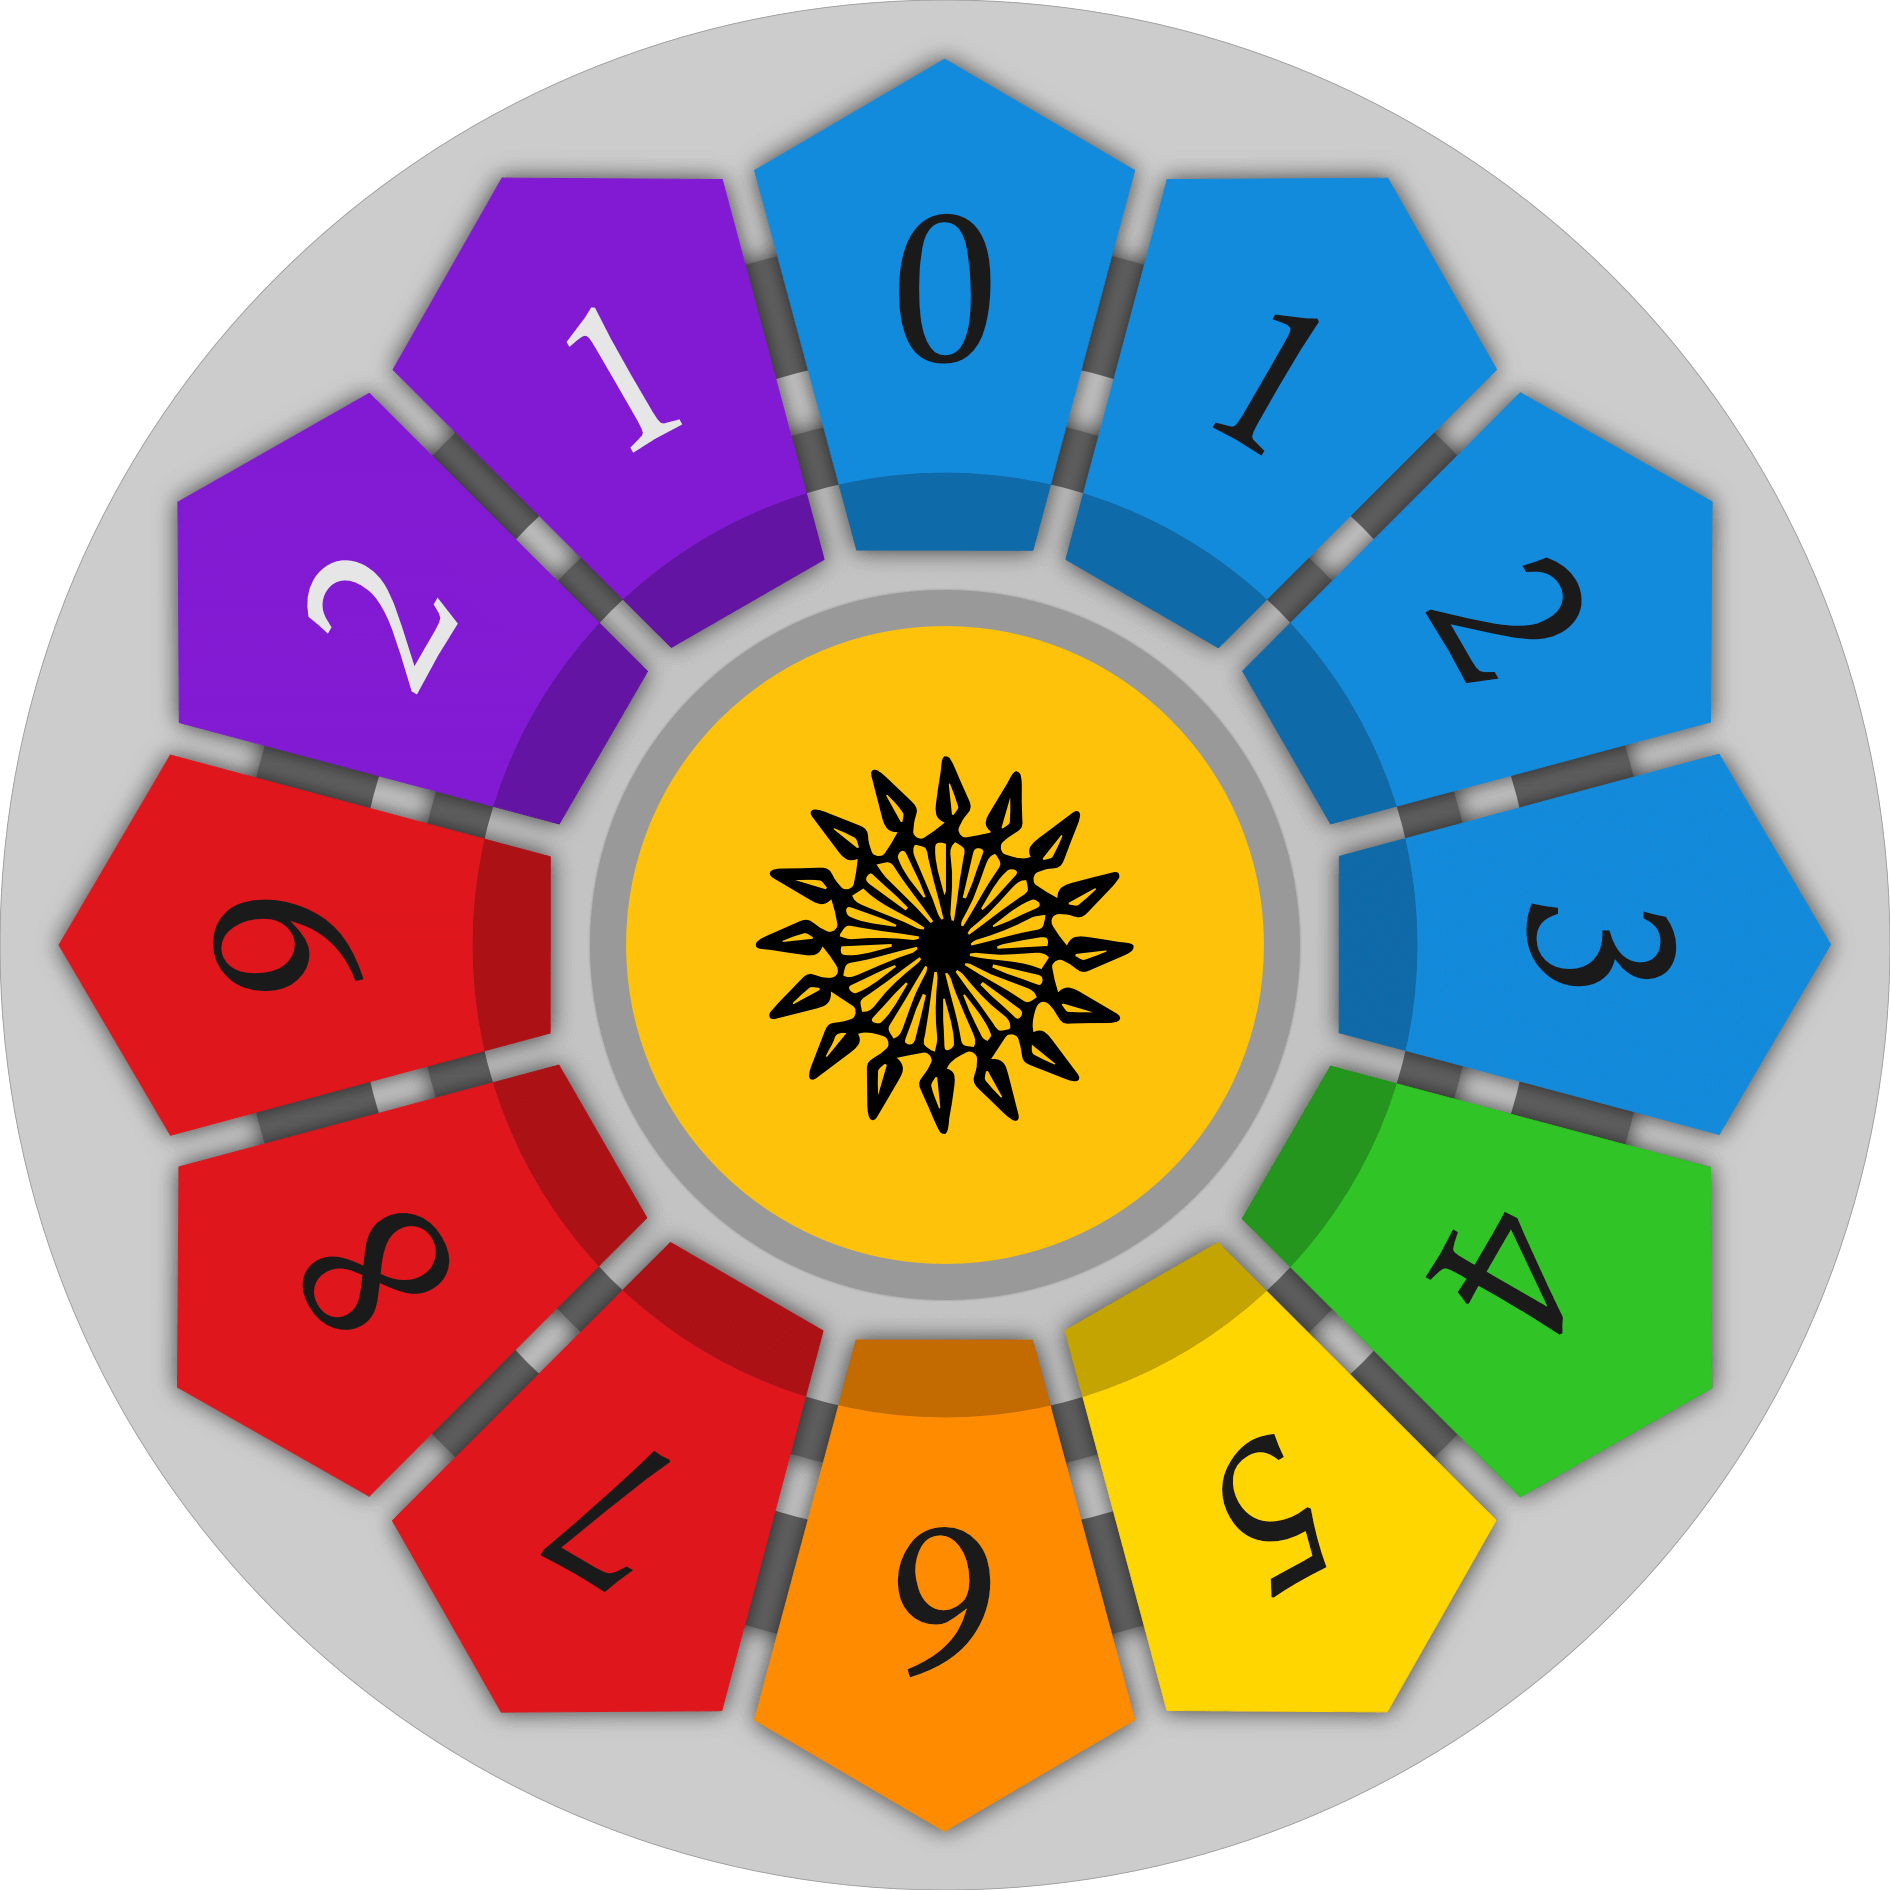
The Wheel records how quickly your faction is acting. The faster you act, the more you will get done but you will have to rush to do it. Survivors who act quickly are noisy and careless.
Haste and Acts are recorded on the Wheel with tokens; black for Haste and grey for Acts. They both begin at zero. Haste is a measure of your speed. Acts are spent to perform actions. When you spend an Act, the Act token is moved counter clockwise one space on the Wheel.
At the start of each turn you will decide how much you want to achieve. You do this by declaring Haste. Haste is a number between 0 and 9. You then reduce your Acts to zero (if they were higher) and increase them by the amount of Haste you declared. Usually your Acts will equal your Haste. You cannot save Acts from previous turns. However, you can borrow a couple from the future.
The Wheel does not stop at zero. It goes down to minus 2. You can keep spending Acts all the way down to minus 2 if you wish. At the start of your next turn you must declare enough Haste to raise your Acts to at least zero. Deficit acts are useful for an extra boost in an emergency.
We want to get a few things done this turn. So we will declare a Haste of 6. We move our Act token to zero, then back up 6 spaces and as you can see this gives us 6 Acts to spend.

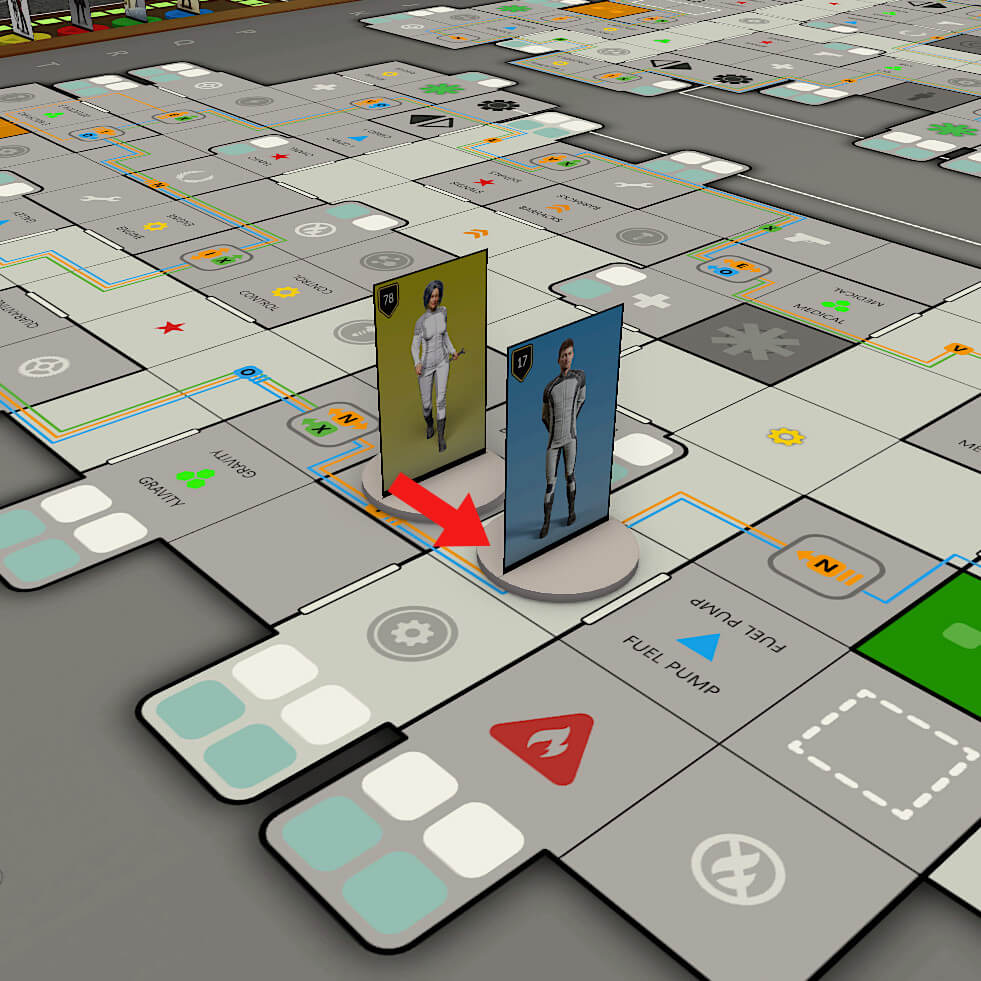
Squads
Squads consist of one or more survivors who occupy the same tile and who belong to the same faction. Survivors from different factions may not occupy the same tile, though they may pass through it to reach their destination.
Each squad is represented on the Ship Map by the standee of the highest ranking squad member. This individual is the squad leader. To show which survivors belong to which squad, the standees of the other squad members are placed on or just next to the Survivor Card of the squad leader.
We will form a squad now, consisting of the three of us; you, Chief Roy and myself. Chief Roy outranks both of us so she is the squad leader. See how our standees are added to her Survivor Card. Our squad is represented by Holly’s standee in the Briefing Room. Holly takes the Acting Squad token. Don’t worry about that for now. We will come back to it.
During play, try to keep your Survivor Cards correctly arranged. It makes things so much easier. The correct arrangement is to group Survivor Cards by squad and then by rank within the squad. I have chosen to order our cards in descending rank order from left to right, but you could do it from right to left if you prefer.
The whole squad is currently facing toward the Plasma Conduit in the Briefing Room.
Baggage
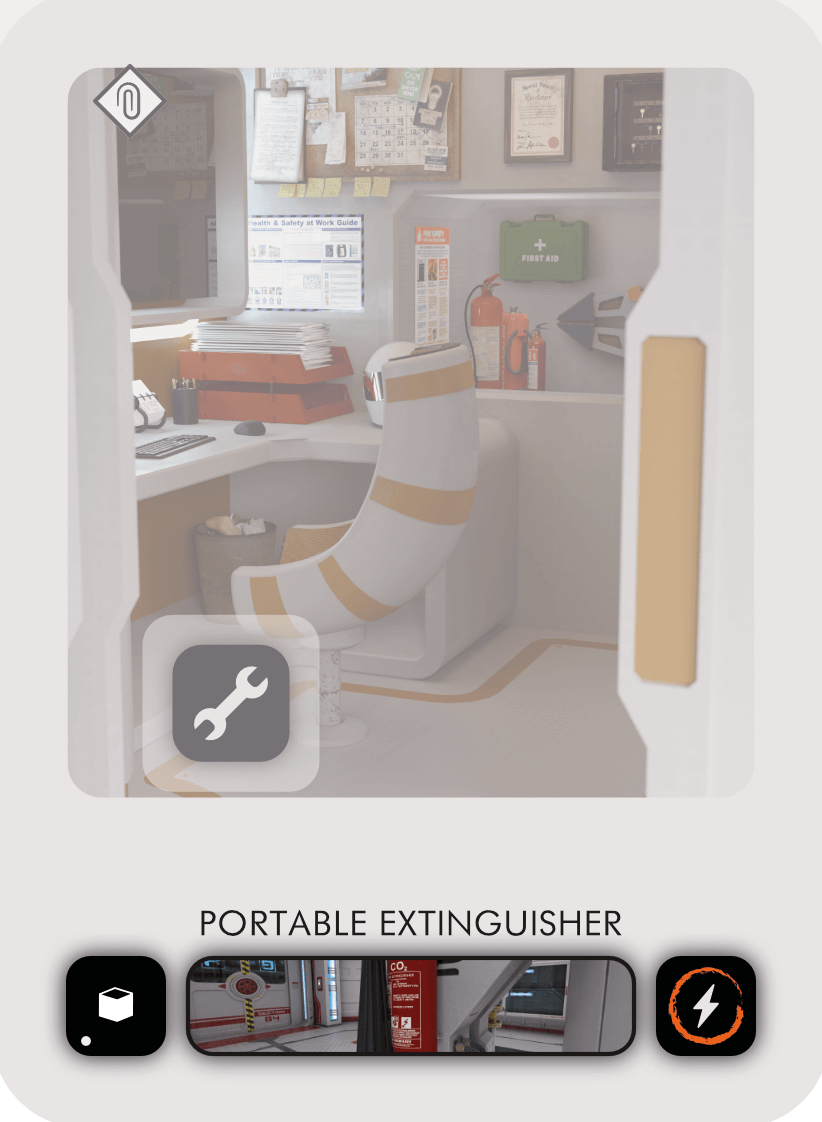
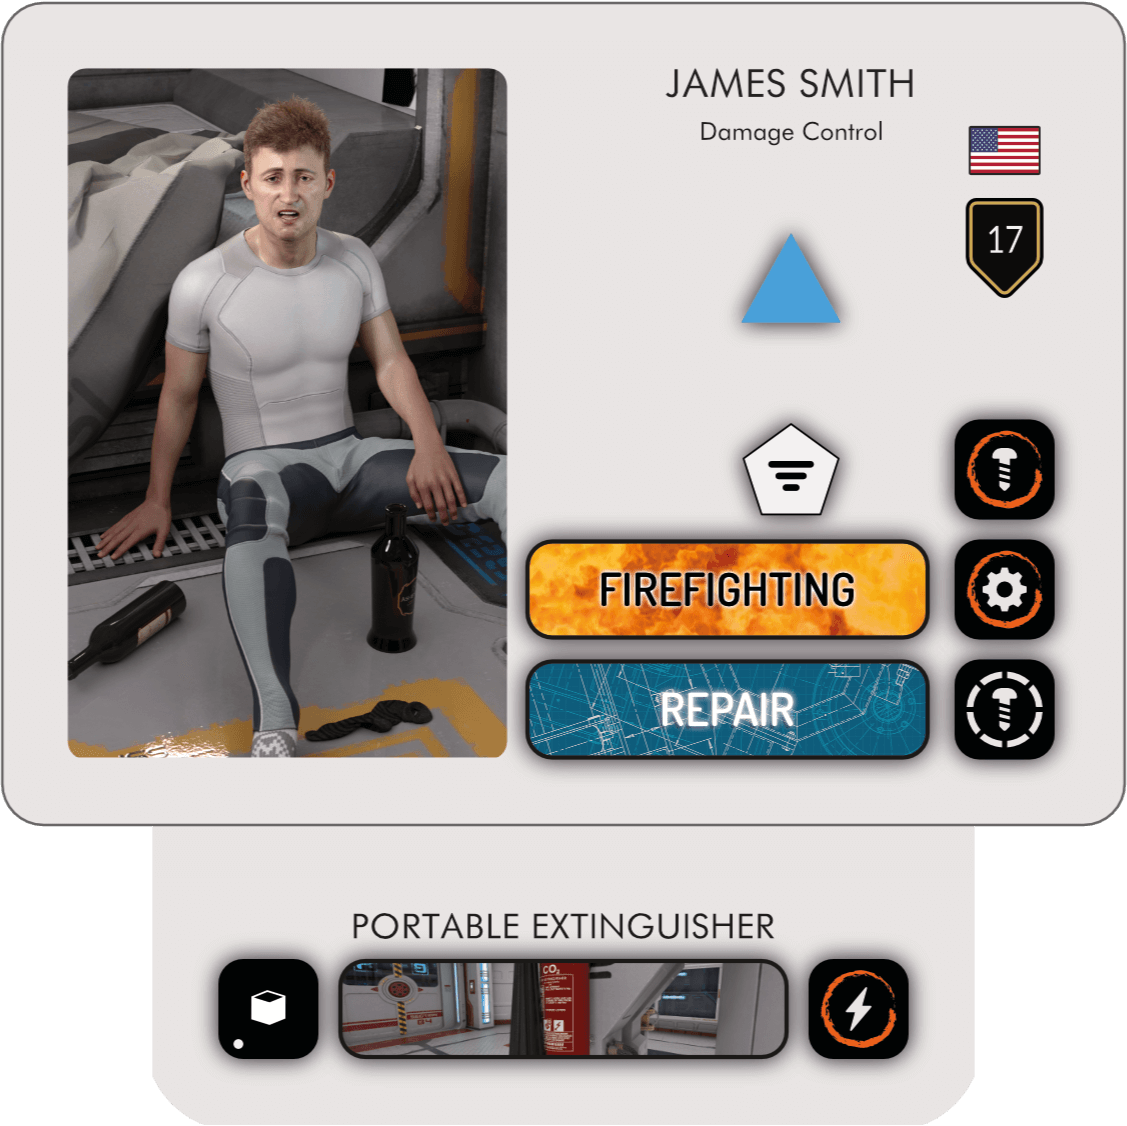
You will find it troublesome to fix things and fight fires without equipment, so let’s find you some. Refer to the image to see your first piece of Baggage. This is a Portable Extinguisher.
Many cards that are revealed during play have an outcome. Outcomes determine what happens when the card is resolved. They are described in a dedicated section along the bottom of affected cards and can be identified by their icons. Not all outcomes are Baggage, but many are.
The upper areas of this card have been greyed out to help you identify the outcome. This outcome is Baggage. The icon in the lower left hand corner identifies it as an item. Also shown is the name of the item, a little portrait and any icons that identify the items actions or properties. There are a lot of icons in Zeno but they are all helpfully described in the rule book.
See how the extinguisher has a similar trait to you. Items can have traits too. The more icons you have in extinguishing fires, the better you are at it. Our little squad is pretty good at this already.
The circular dot in the item icon is Encumbrance. The Portable Extinguisher has one dot so it counts as having one Encumbrance Point. Survivors can carry up to 4 Encumbrance Points and still move. If a survivor has more than that, you will have to re-arrange their Baggage or discard something if you want them to move anywhere. While it may prevent them from moving, there is no limit on the amount of baggage a Survivor can be equipped with.
For now, let’s focus on picking the item up. When you resolve a baggage outcome for a squad, indicate a squad member to be be equipped. Then slide the card underneath their Survivor Card with only the outcome showing.
Refer to the image to see how this is achieved. There! You now have a fire extinguisher. A fire extinguisher is not much to send you to work with. So we will give you some tools as well.
We equip the tools in the same way. However, we now have a choice. We can add the tools above or below the extinguisher. We will choose above for now. Hopefully things will need maintenance more often than they will catch fire.
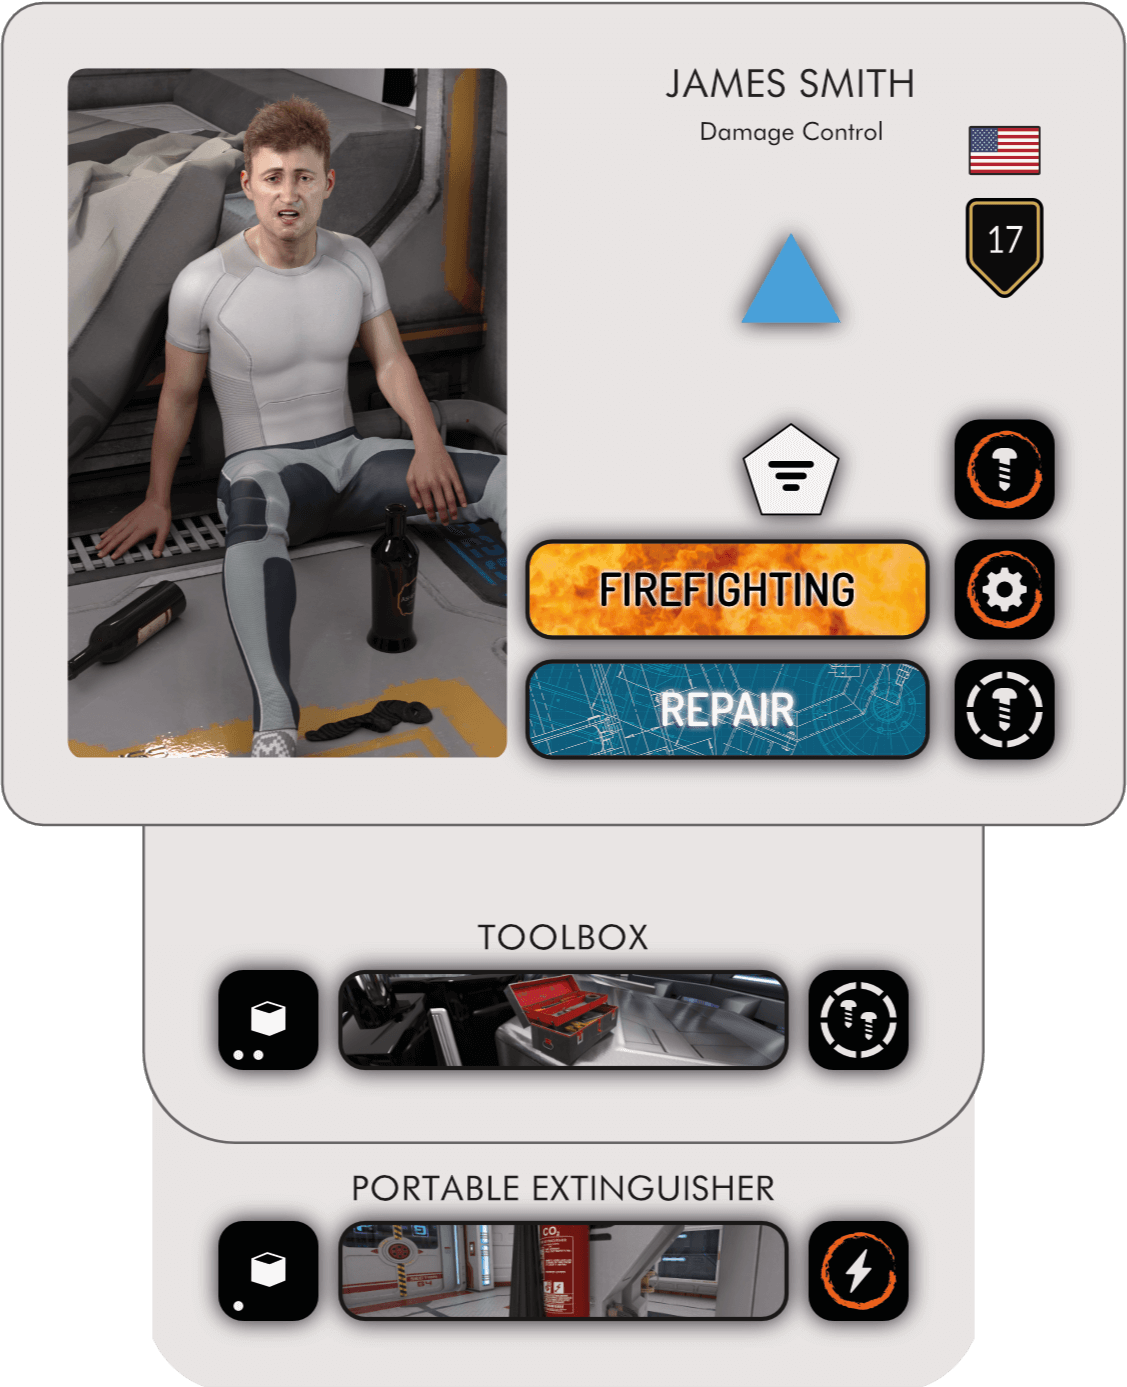
We just made our first stack! A stack consists of two or more baggage outcomes equipped to the same survivor. It does not really matter that the tools are higher than the fire extinguisher. Items function just fine wherever they are in the stack, except for weapons.
In combat, survivors automatically use the highest weapon in their stack. If this is a pistol they then use the next pistol in the stack too, if there is one.
Combat in Zeno is chaotic and violent. Your survivors will not get an opportunity to root around in their belongings for a weapon. They will just let fly with the weapon(s) they are holding.
You cannot move items around at will. Once a stack has been formed, you must use the Re-arrange action to alter it. The good news is that a single Re-arrange action allows you to edit the baggage of the whole squad, changing all the affected stacks as you wish and moving items between survivors in the squad as you see fit.
If you no longer want an item equipped you can discard it at any time in your turn, with a few exceptions. Mission items cannot be discarded.
Actions
Now you are suitably equipped we will start taking actions. Actions are always taken by a single squad. Indicate the squad and announce which action the squad will perform. Then execute the action.
There are 6 Basic Actions and 4 Maneuver Actions but the two most common actions you will take are Rotate and Move. Actions usually cost one Act to perform but a few are free.
Use the Rotate action to turn your squad standee to face an adjacent tile they can (in theory) move into. There is no diagonal movement in Zeno. So there are only 4 possible ways to face; up, down, left or right. If your next action is to move this squad, that Move action is a free action.
Use the Move action to move your standee one tile forward in the direction it is facing, if able.
We are facing the right way so we will simply spend an Act to perform a Move action. This moves our squad one tile forward in the direction it is facing. We then reduce our Acts by one.
This is the most basic type of Action you can do, but you will be doing it a lot so it is best to get it right.

Let’s start getting a little more ambitious. You will leave the Briefing Room on your own. Holly and I will stay here and keep in touch by radio.
We take a Rotate action to align our squad with the airlock and then a Move action to go through. Rotating costs an Act but makes the Move free. However, we will combine this with the Split action.
When moving, take the Split action to split a squad into two squads and move only one. Reposition standees as required. If one of the squads was your Acting Squad, choose which of the new squads will be your Acting Squad. Splitting a squad costs an Act. This is additional to any Act spent to move.
The result of this is that we spend two Acts and we end up with two squads in two different tiles. You become the squad leader of your own squad. You can take the Acting Squad token too.
We have rigged the passage you are now in with neuro-holographic emitters. This will make the things we project out there seem very real to you indeed. That is why you are the Acting Squad.
Acting Squads
While you have any Survivors at all you must have one Acting Squad. At the start of your turn you may change which of your squads is your Acting Squad. When it splits, nominate which squad formed by the split will inherit the Acting Squad token. Always store this on the Survivor Card of the affected squad leader.
During your turn, your Acting Squad is the focus of the narrative. When a scene occurs on your turn, as it inevitably must, it happens to your Acting Squad. For this reason only your Acting Squad may explore. We will describe exploration and scenes in the next tutorial.
Within the boundaries outlined here, it is up to you which squad is your Acting Squad. It does not have to be the biggest squad or the squad with the highest ranking survivor.
Harm
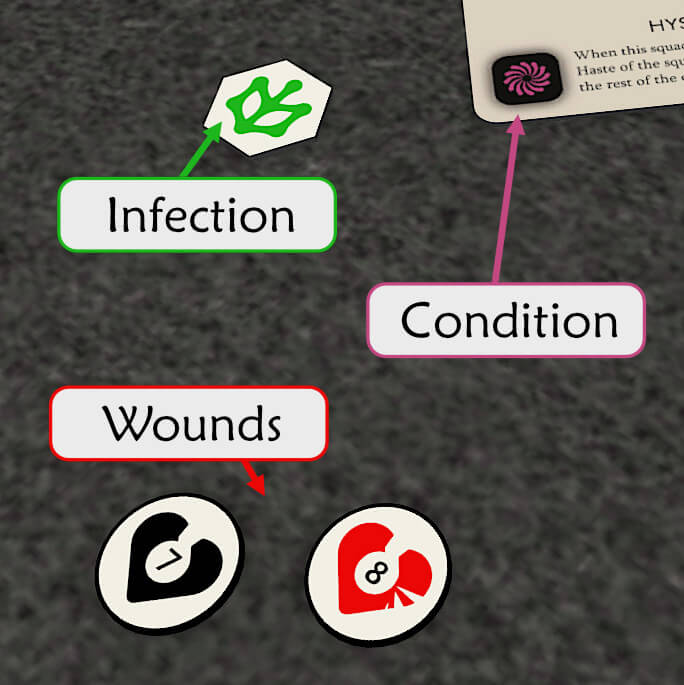
Survivors sometimes get hurt. We call this Harm. Survivors do not have hit points or health points in Zeno. They instead suffer light wounds, heavy wounds, infection and/or conditions.
Light Wounds are fractures, burns and other non deteriorating injuries. While these may worsen in time, they are stable for game purposes.
Heavy Wounds are potentially fatal injuries. Survivors with a heavy wound will deteriorate unless treated. Also, survivors with a Heavy Wound are Slowed. This means they cannot move as fast.
Conditions are a type of baggage which confers special rules on the survivor and/or the squad they belong to. Conditions cannot be voluntarily discarded or transferred.
Infected survivors have been corrupted by the Threat. Infected survivors do not count towards your evacuation target. If an infected survivor is infected again, their original infection matures and they die.
Wounds
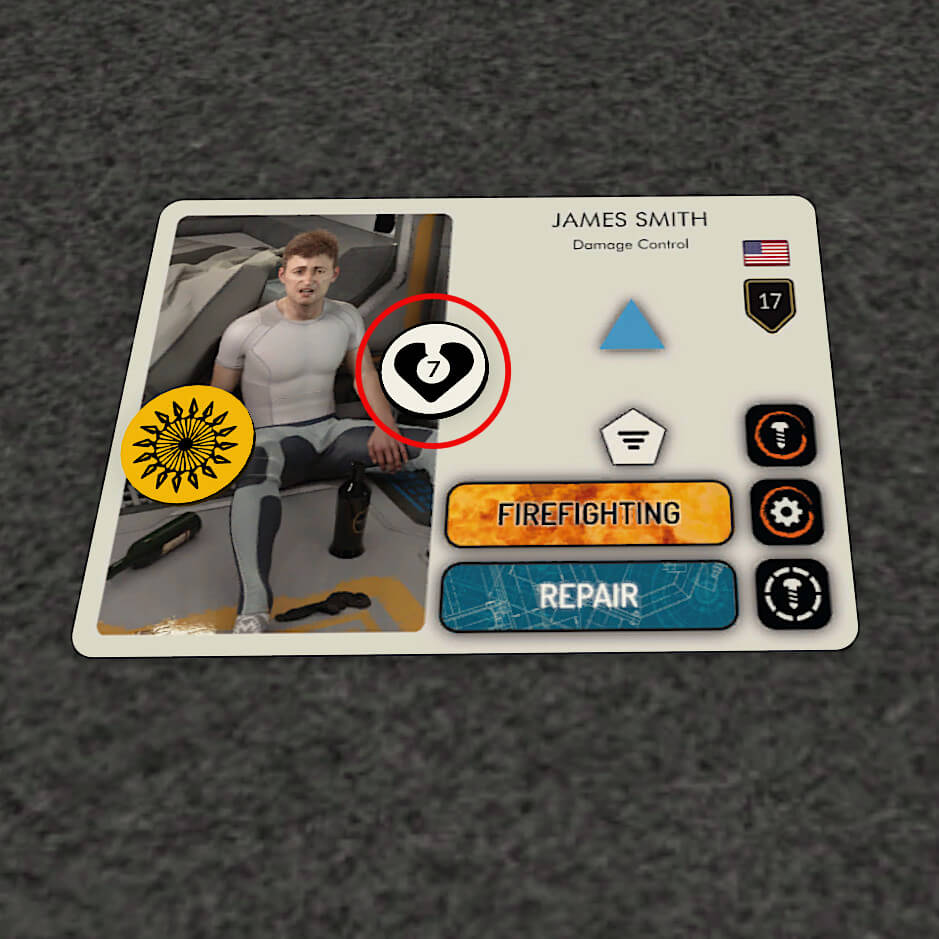
Light and Heavy Wounds are tracked by Wound tokens. These are double sided; one side records Light Wounds and the other side Heavy Wounds. Heavy Wounds are red in color with three slashes displayed on the right side. Light Wounds are monochrome. They can be black or white. Usually they are black.
At the start of the game all wound tokens are added to an opaque container. When a Survivor receives a wound, a token is drawn at random from the container and added to the affected Survivor Card, with the correct wound type face up. Wound tokens are numbered from 2-9 with lower values indicating more serious wounds.
No survivor can have two wounds. If a wound would be added to a wounded survivor, a token is drawn and the new and old tokens are compared. If the new wound is more severe, it replaces the old one. If a light wound replaces a heavy wound, it is then flipped over to become a heavy wound.
If the new wound is no worse, the existing wound worsens. When Light Wounds worsen they are flipped over and become heavy. When Heavy Wounds worsen the affected survivor bleeds out and is eliminated.
We will simulate harm now. If you look up you will see the ceiling in the passage is violently collapsing. You may experience some discomfort as the debris crushes you to the ground.
Let us call this a Light Wound. The debris is not all that heavy.
We draw a random wound token from the container (without peeking!) and add it to our Survivor Card. Depending on the wound it may be necessary to allocate a wound to a specific survivor, but we do not have to worry about that here. Firstly, because when a squad suffers a Light Wound all survivors in the squad suffer a Light Wound. Secondly, because there is only one survivor in this squad anyway. So it would be obvious who to apply any kind of harm to. It would have to be you!
The Light Wound we draw has a Severity of 7. The value on the token indicates how bad the wound is. Severity ranges from 2 to 9, so this is not too bad. We add the token to your Survivor Card and for now that is that. Light Wounds don’t get worse on their own and they don’t slow you down. However, they do make further wounds more troublesome. Survivors with broken ribs and fractured limbs are less able to fend off attack or get out of harms way. This magnifies any harm they receive in the future.
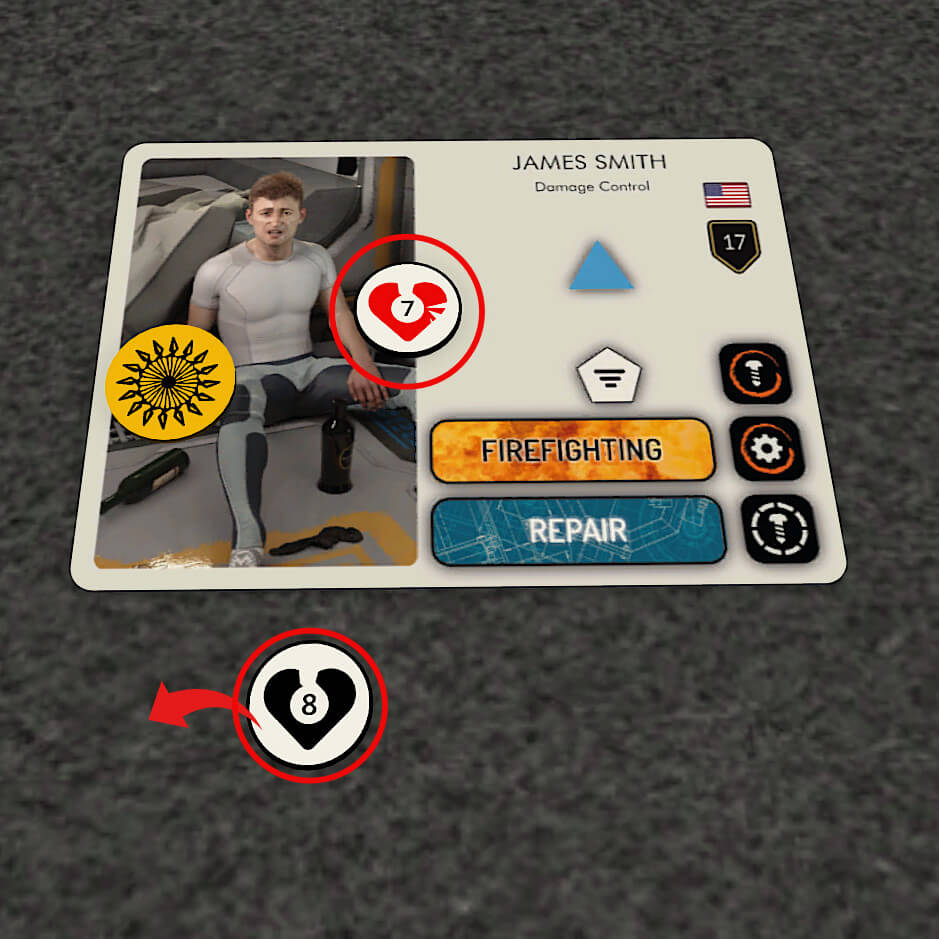
To demonstrate this, we will continue our simulation. I see you are passing through a narrow opening. There is an electrical panel there. We will make it explode, filling that little passage with white hot slivers of steel. This is still a Light Wound. The difference this time is you already have one.
We draw a wound token from the container and compare it with our existing wound. We have drawn a less serious wound this time. It has a severity of only 8. The token is returned to the container. However, wounds always do something. We flip our existing Light Wound over. Now it is a Heavy Wound.
You now have a Heavy Wound with a Severity of 7. As you can see, the values are the same on the front and the back of the tokens.
Heavy Wounds slow survivors. A squad may not benefit from the Move action while your Haste exceeds the severity of a Heavy Wound belonging to one of it’s survivors. Our Haste is 6 and your Heavy Wound has a severity of 7, so you are okay.
If you wish to move a squad containing heavily wounded survivors, you can still do so. Use the Split action to break up the squad, leaving the badly wounded behind. Alternatively, declare less Haste next turn so they can keep up.
We will end the simulation now and you can come back.
Conditions
Surprise! We have not ended the simulation at all. The floor in front of you erupts in a sheet of flame, tearing ragged chunks out of the armored bulkheads. By some miracle you are unhurt. However, you are not unchanged.
We are going to give you a Condition. Not all Baggage outcomes are items. Some are Conditions or Judgments. The rules for applying these vary, but they are simplified in this case because you are the only survivor in the squad.
Conditions are equipped just like items. Once equipped, the text effect applies. Usually this affects the squad the survivor belongs to. Sometimes you entire faction will be affected.
Some game effects cause Conditions to be suppressed or even discarded. Suppressed Conditions no longer apply, but the Condition does not go away.
There are 3 types of Condition; Chaos, Fear and Reason. Chaos Conditions indicate a disordered mind. Fear Conditions are anxiety related. Reason Conditions reflect the breakdown of rational thought.
Judgments
I wasn’t going to do this, but Holly insists. I think she feels sorry for you.
Sometimes a survivor will discover something suspicious or remarkable about another survivor in play. This creates a Judgment. The nature of the discovery determines whether the Judgment is positive or negative.
Judgments are a special type of Baggage. When equipped to a Survivor, another Survivor in play becomes the Object of that Judgment. This is usually a Survivor in another faction but we will make an exception in this case. We will equip the Judgment to you and I will become the Object. The Survivor equipped with the Judgment is the Subject.
Each faction has a Judgment token. When one of your survivors is equipped with a Judgment, the token is added to the Survivor Card of the Object. So we will add our faction Judgment token to my Survivor Card.
Judgments conclude when the Object dies, the Subject dies, the Shuttle is launched or the player controlling the Subject is obliged to implement another Judgment, with one of their survivors serving as the Subject.
When a Positive Judgment concludes, it succeeds if the Object is still alive. Otherwise it fails.
When a Negative Judgment concludes, it succeeds if the Object is dead. Otherwise it fails.
Judgments enable a new action, namely the Showdown action. This is the only means by which one Survivor may attack another. When a negative Judgment is in play, the Object and the Subject may use violence upon each other. We will not get into the specifics of that here.
We will end the simulation for real now, discarding your Condition, Judgment and Wound. There. Now we are all back to normal. Come on back to the Briefing Room.
Missions
It is nearly lunch time. We have only one more thing to discuss this morning and then you can head to the cafeteria.
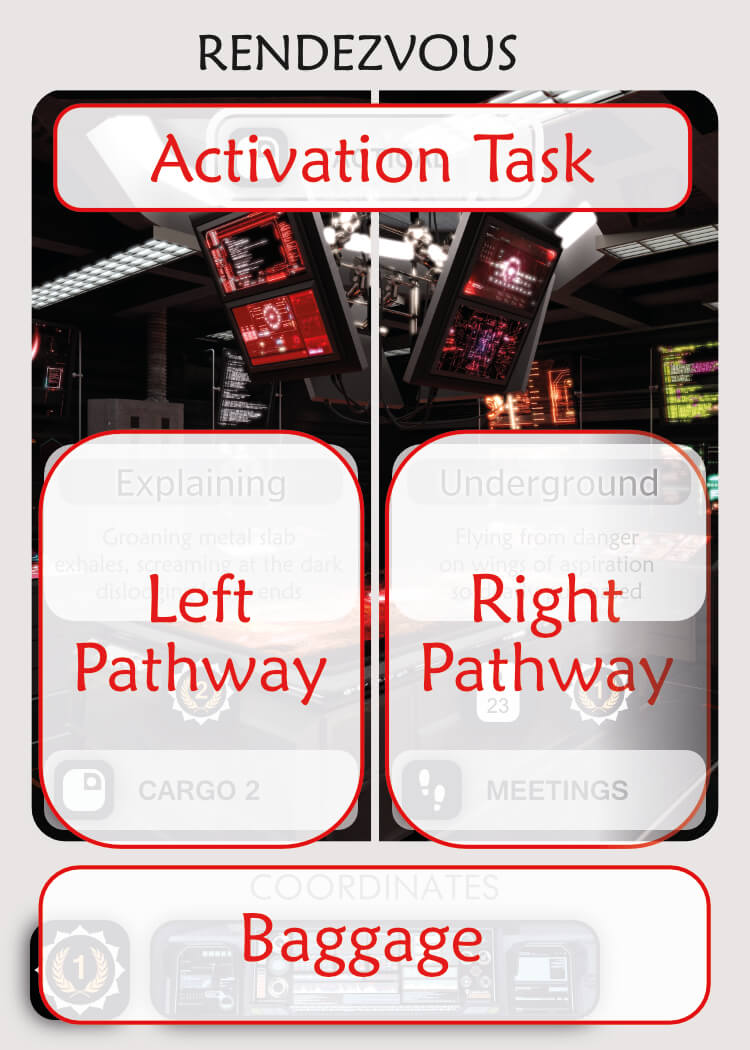
Most outcomes invalidate the rest of the card they appear on. By the time you equip an item or a condition, the upper part of the card has already been resolved and no longer applies. Missions are different. You will begin the game with 2 Mission Cards. These are secret and must not be shown to the other players.
The top part of a Mission card defines an Activation Task. Until this happens the Mission remains dormant in your hand. You may activate a mission during your own turn if/when a squad you control completes the activation task. The card is then revealed and you must equip it to the survivor in the affected squad just like any other kind of Baggage.
Every Mission has two pathways; left and right. These reflect the two different ways the mission can progress after activation. Each pathway has it’s own Task.
When a Pathway task is completed, the icons just above the task are executed from left to right. This may award you successes, items, survivor or something else. Missions are very diverse. The mission shown will reward you with two Successes if you complete the left Pathway task in Cargo 2 or one success and the nominated Survivor if you complete the right Pathway task in Meetings.
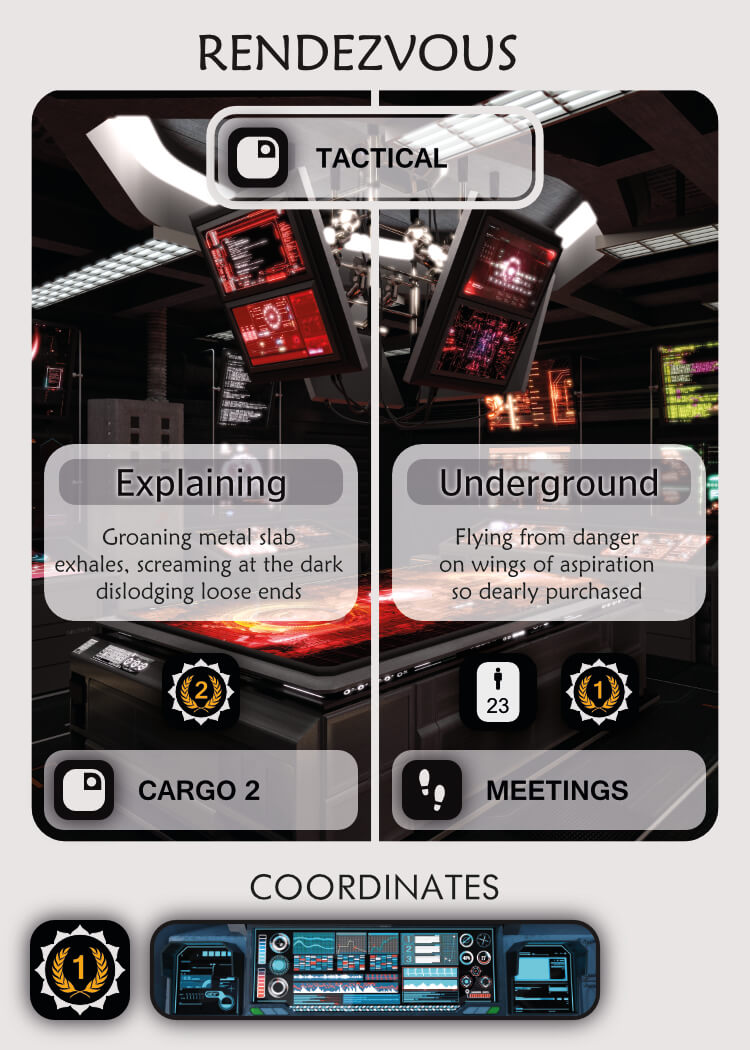
Pathways give you freedom. Every mission has two paths and they may be radically different. You can progress the mission along either path.
You do not have to decide what you are going to do when the mission activates. Until you complete a Pathway task you still have the freedom to choose.
Some paths are longer or more difficult than others, but the rewards are higher. Others inflict damage on the ship. On most cards, the left path is the longer, harder or more selfish path, but confers higher rewards. The right path is usually shorter, easier and potentially benefits the ship, but the rewards are less generous.
There is no right or wrong way to complete missions. You will have to size up the options available to you when deciding how to complete a mission.
The four key areas of a mission card are identified on the image shown.
Summary
In this tutorial we learned more about Divisions and Survivors. We discovered how to declare Haste and perform Actions. Harm was introduced and vigorously applied.
If you want to revisit any of these items, just click on them to return to them now. You can always come back here later for your celebratory cup of coffee. Congratulations on completing your induction!
