- +44 (0)7312 869921
- sargassogames@gmail.com
- Mon - Fri: 9:00 - 18:30

Menu

Tutorials are designed to give you a taste of how Zeno works. They are not a substitute for the rule book. The tutorials chart the career of a freshly qualified technician, from his induction to his promotion. Currently there are two. The third and final tutorial will explain Scenes.
Welcome to Danziger Dock, the orbital shipyard which builds and outfits the majority of Imperial Navy ships. My name is Magnus and I am an artificial person. You probably have not met an artificial person before. I am a synthetic cybernetic organism built to serve the Empire. Please save all questions until the end of your induction.
We hope your stay here will be a pleasant one but you must expect to be busy. As the best assessed cadet at your technical academy, you have been selected to work on the Riga. This is the most sophisticated spacecraft the Empire has ever built and you will have the honor of helping to commission her. The hull and internal structure have been completed, but there remains much to do.
Before you can begin work, you will need to be able to find your way around the ship. That is the purpose of this induction. By the end of it you should be able to identify the main components of the Riga and understand how to read the ship map. These are essential building blocks for the rest of the course. You will then have earned a well deserved cup of coffee with your new shipmates. We will begin with some information about the Riga.

The Riga is 1575 metres long overall, with a beam length of 489 metres. She features over 9 square kilometres of internal decking and enough internal wiring to reach from the Earth to the Moon. She boasts her own public transport system. Her four engines are each as large as an 80 storey building. The Riga is like a small town in space.
Let us have a look at her on the main map. Click on the map to enlarge it.
Sorry, I forgot. You have not seen an Imperial Navy map before! It may feel a little intimidating. However, almost everything will make perfect sense soon enough. You can access the map from any screen on the ship or in the dock. It will pop up and tell you everything you need to know, as long as the internal sensors are operating. The Ship Map is designed to be read from either side with equal ease. It is also color blind friendly. While colors are used to help distinguish symbols, nothing is purely color dependent.
The tutorial will now begin. Each section of text is accompanied by a helpful image. This will appear either to the right of the text or below it, depending on your device. Click on the image to expand it. You may wish to refer back to this large map as we proceed, but it should not be necessary.
Welcome to the Riga
We are not going to cover everything right now – it is your first day after all. Let’s just walk through the basics to begin with. You can begin by examining the image below.
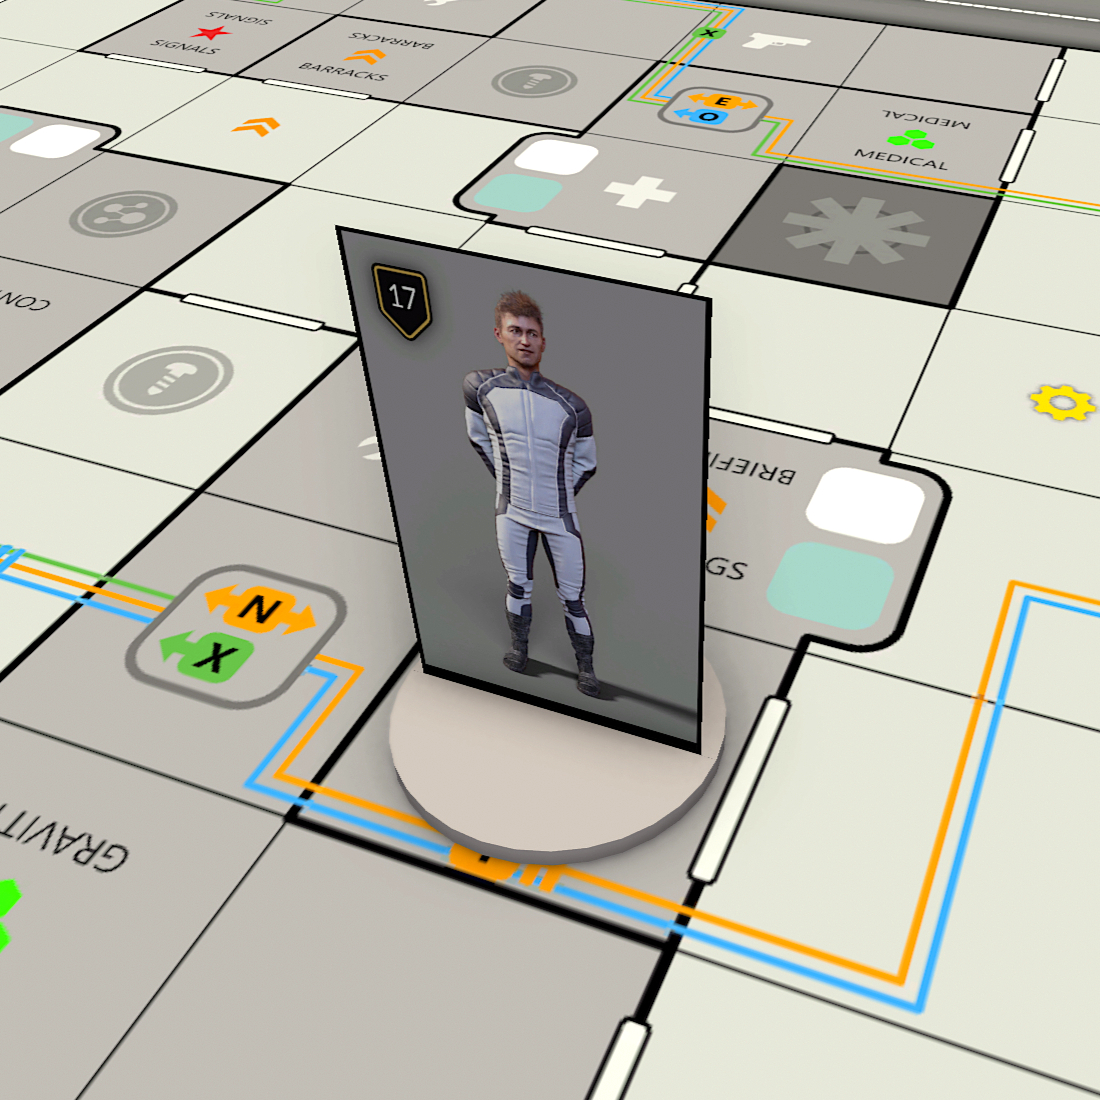
Surprise! That’s you. The ships computer constantly monitors the whereabouts of the crew, reading their life signs and sub-dermal chips to determine their whereabouts. The location of each crew member or guest aboard the ship is recorded by a standee. If multiple people occupy a small area, the standee of the highest ranking individual is displayed.
As you can see, you are currently in the briefing room. Your standee is shown because you are the highest ranking individual present. Yes, you outrank me. Most natural humans outrank artificial people.
If you take a close look at your standee you will see your rank number displayed. This is unique to you. No crew member on the Riga has the same rank number as another. The ship hierarchy is simple. Those with higher numbers outrank those with lower numbers. Something you cannot see here now is the reverse side of your standee. Whereas the front of your standee shows your front side, the reverse side shows your back. This allows us to tell which way you are facing.
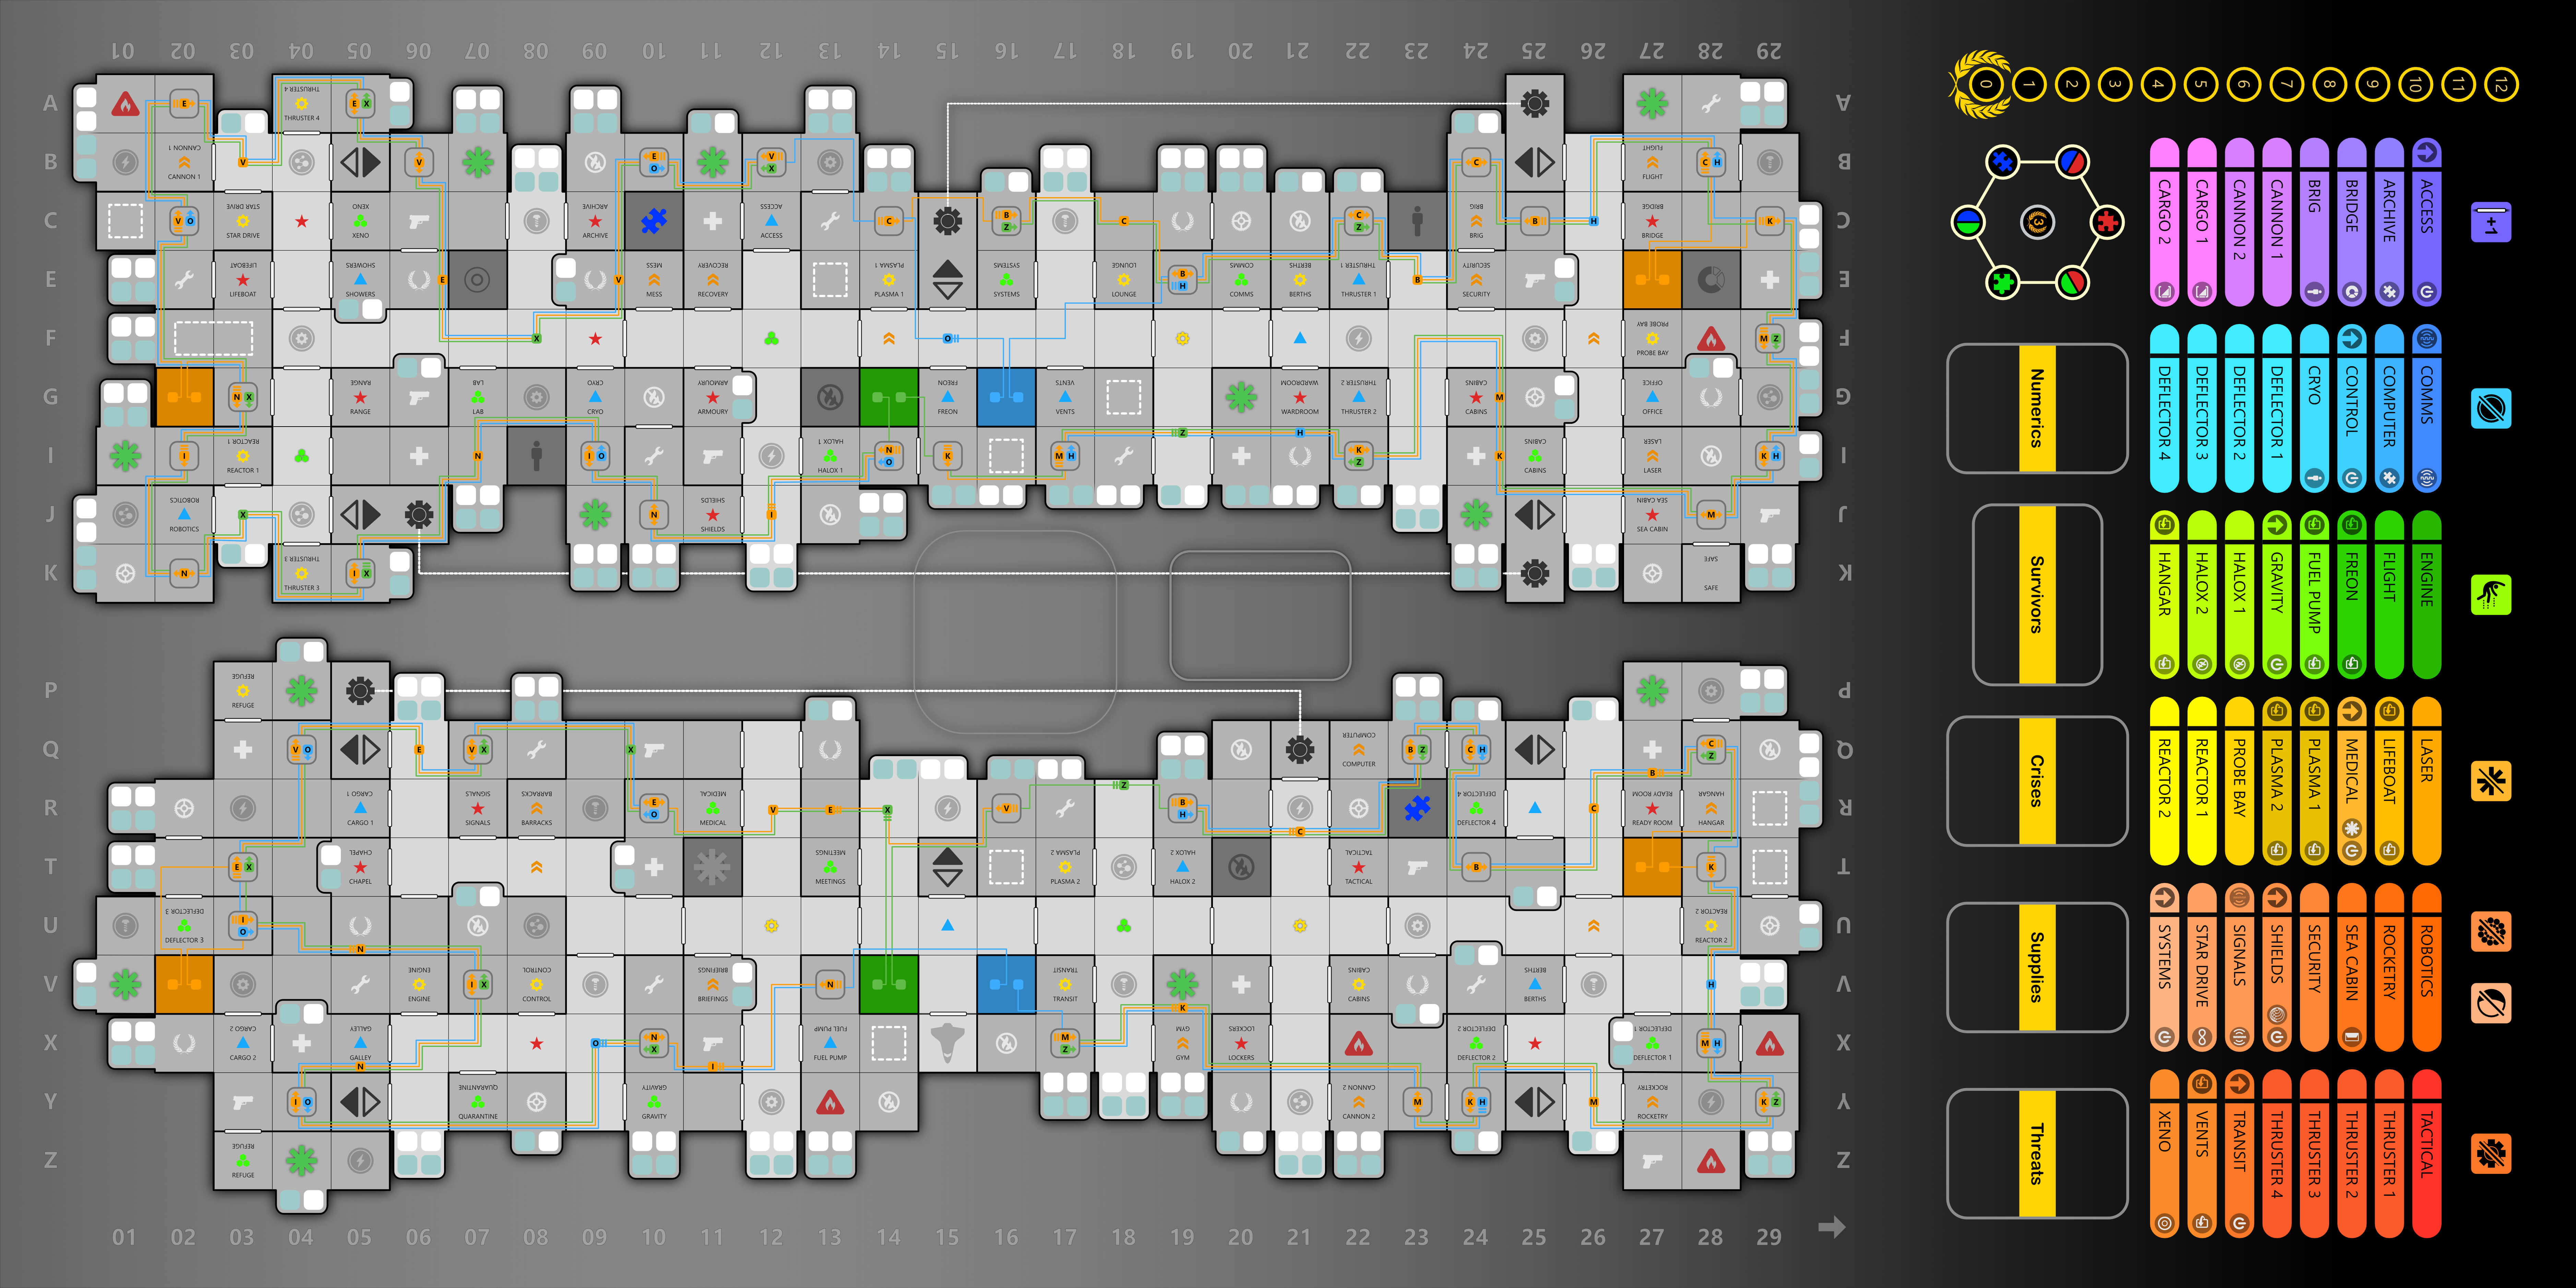
The map has two main areas; the Ship Map and the Status Panel.
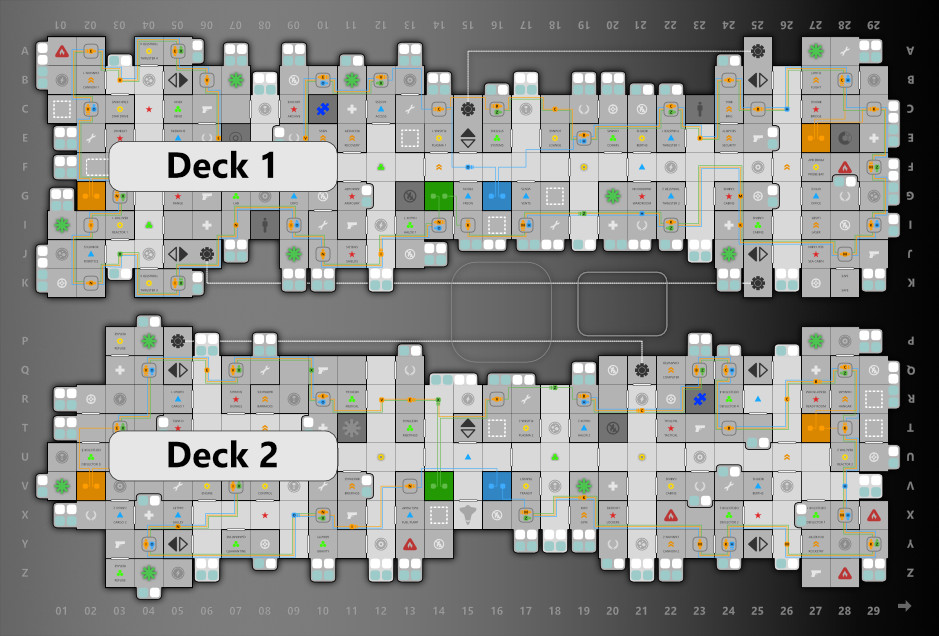
The Ship Map shows the two decks of the ship from a top down perspective, with the ship structure outlined and useful information represented by symbols. Deck 1 is the upper deck. This contains many of the command and science functions of the ship. Deck 2 has some of these too, but the lower deck is chiefly the preserve of maintenance and engineering. Observe the arrow in the corner of the map. This shows which way the ship is facing.
The numbers along the top and bottom of the ship map are frame numbers. They are complemented by centreline letters on each side. Cross reference these characters to identify where you are on the ship. The tile you are currently located in is X-11. Feel free to zoom in on the image to verify this.
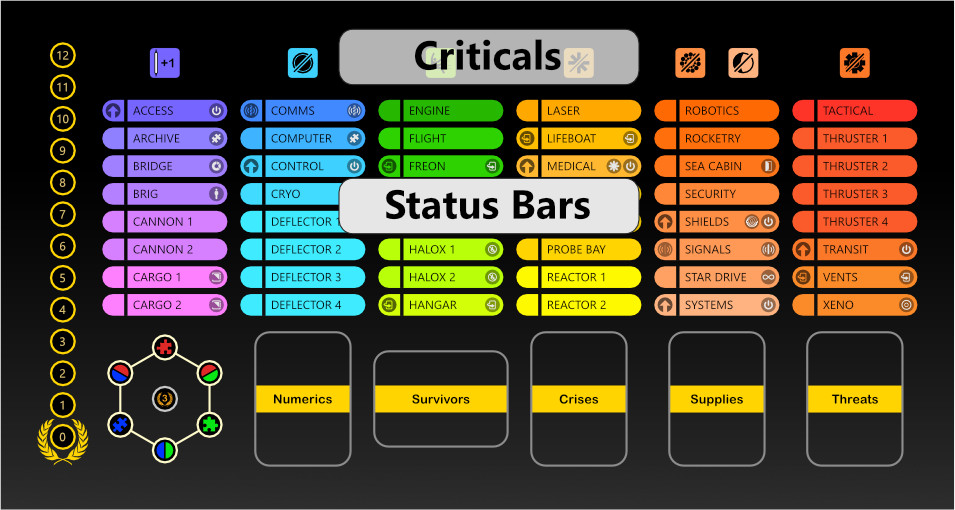
The Status Panel displays Status Bars for the 48 ship systems of the Riga in alphabetical order. By referring to these you can tell at a glance whether a system is functioning. The circular icons on the Status Bars reflect any special functions or failure effects associated with them.
Of the 48 systems, 9 are especially important. These Critical Systems (or Criticals) are each accorded a special icon along the top of the Status Panel. If any of these are not functioning, special rules apply. The 9 Critical Systems are Access, Damage Control, Gravity, Medical, Shields, Systems and Transit. There is more to the Status Panel than this, but we will save that for another tutorial.
It is usual for new crewmen to become a little pale at this point. Take a deep breath. It will pass. Nobody expects you to memorize all of the ship systems. You will probably never have cause to even see all of them. Just be reassured they are there. Without them the Riga would not function.
As long as these systems are all operating the Riga is probably okay. That is all we are going to say about the Status Panel for now. The remainder of this tutorial will focus on the Ship Map.
Ship - Interior
For convenience, the Ship Map does not accurately reflect all the internal spaces of the Riga. It is not a blueprint but a simplified aid. Key passages and compartments are enlarged and given prominence. However, the shape and scale of the interior is generally correct. You will observe that we have encountered our first naval terminology, namely Compartments and Passages.
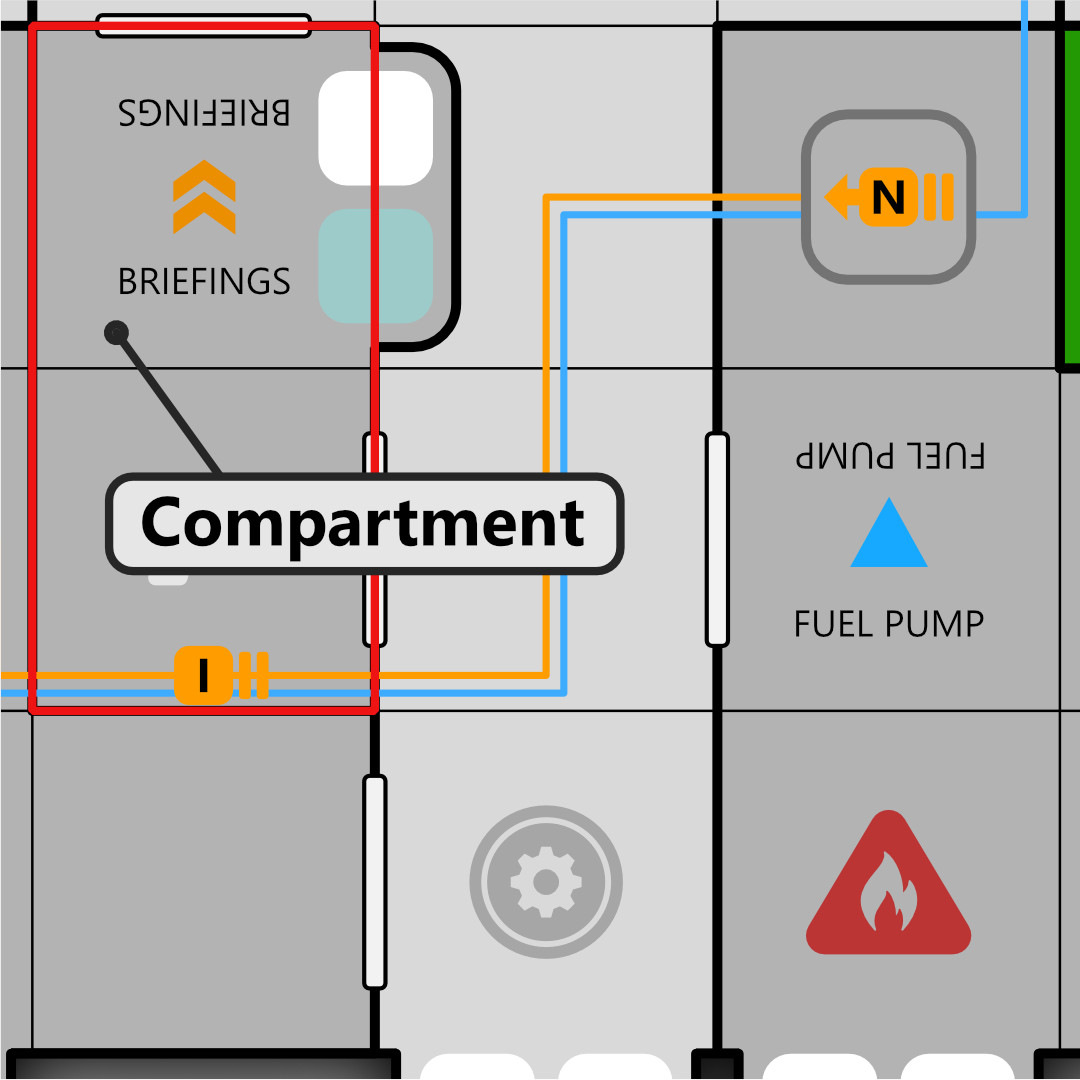
Compartments are airtight spaces located vertically between decks and horizontally between bulkheads. They are like rooms in a house. The major compartments on the ship are named but do not let the simplicity of the map fool you. As you will have seen on your way through, there is more than one room in Briefings. It is a maze! Refer to the image to identify the Briefings compartment.
Major compartments frequently consist of many smaller compartments, passages and machine spaces. You can think of major compartments as a representative compartment of that type. Look for Fuel Pump on the map. It looks simple enough. In reality it is a labyrinth of many different small compartments, crammed full of oily pipes, hissing ducts and noisy machinery.
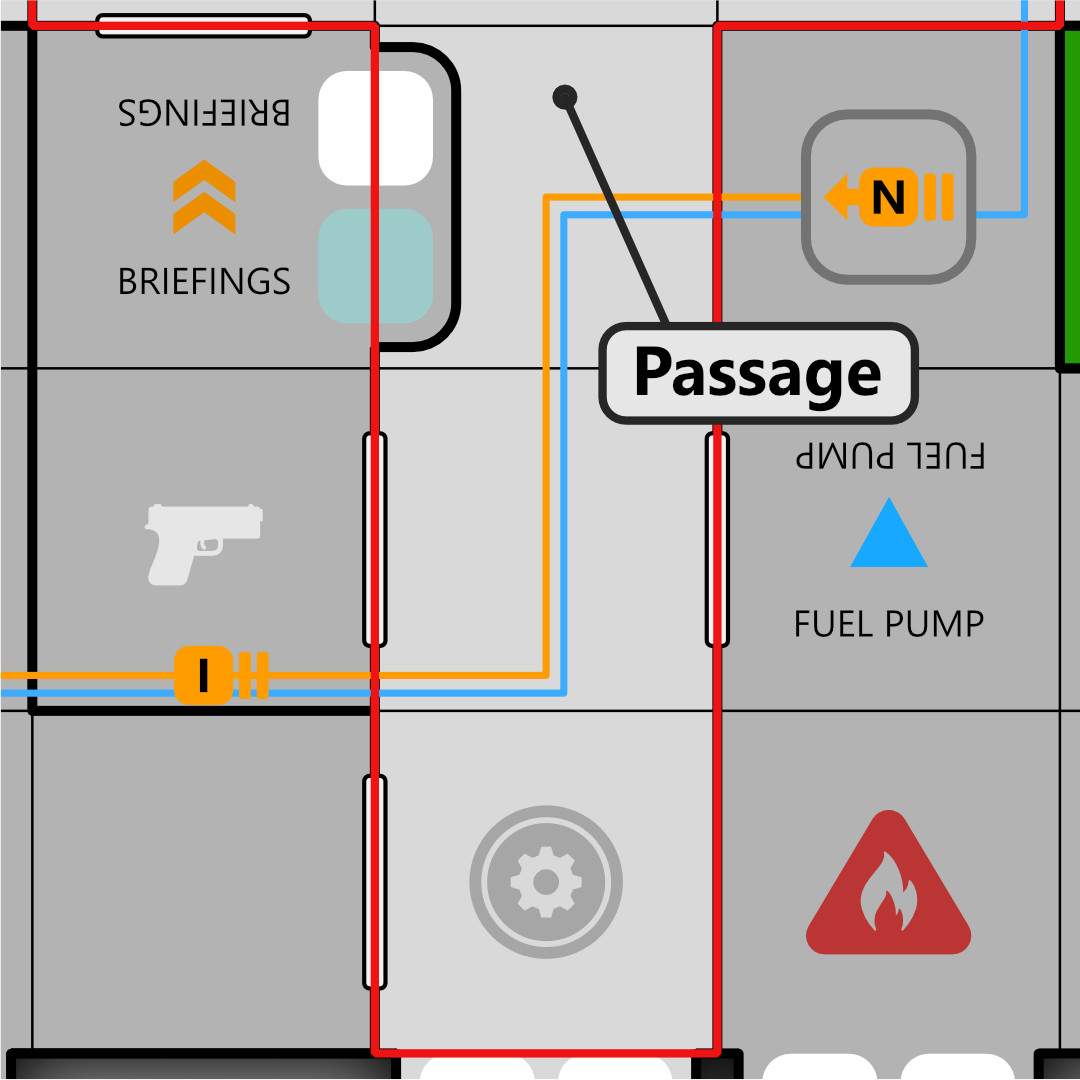
Passages are connecting areas. They are like corridors. While there are many passages within compartments, there are only a few major passages on the ship. This serves to keep the ship airtight in a crisis. Not all passages are empty spaces. Some feature ancillary compartments, rest areas and storage. Staff seeking privacy or space have been known to commandeer these auxiliary spaces for their own use. The passage outside Briefings is outlined on the image.
Major compartments and passages are individually airtight. They are connected to each other by computer controlled airlocks. Within a major compartment, minor compartments are separated by hatches and doors. These are not routinely closed. As a result, each major compartment and major passage has it’s own atmosphere. The air in a major compartment circulates freely through all the minor passages and compartments within it.
Compartments and passages are identified on the Riga by shade and name. Compartments have a darker hue and are named. Passages have a lighter hue and are not named. Collectively, we refer to compartments and passages as Sections.
Ship - Structure
The map is divided into square tiles. Each tile is considered to be adjacent to the other tiles it is touching horizontally and diagonally on the same deck. Refer to the image where the red tile (1) is adjacent to all the blue tiles (such as 2). There are no tiles outside the ship.
The ship is enclosed by an armored hull. Though not impenetrable, this is strong enough to keep the crew in and space out. Although there are airlocks in the outer hull, these are not displayed. They are not important areas of the ship. Trust me, you do not want to go for a walk outside.
Bulkheads separate areas from each other. You cannot pass through a bulkhead. You will need to use an airlock to get from one area to another.
Airlocks divide sections. You do not need to open airlocks yourself. The computer will detect your approach and operate the airtight doors for you in the correct sequence. In the event of a malfunction, airlocks can be manually operated by accessing a hand crank.

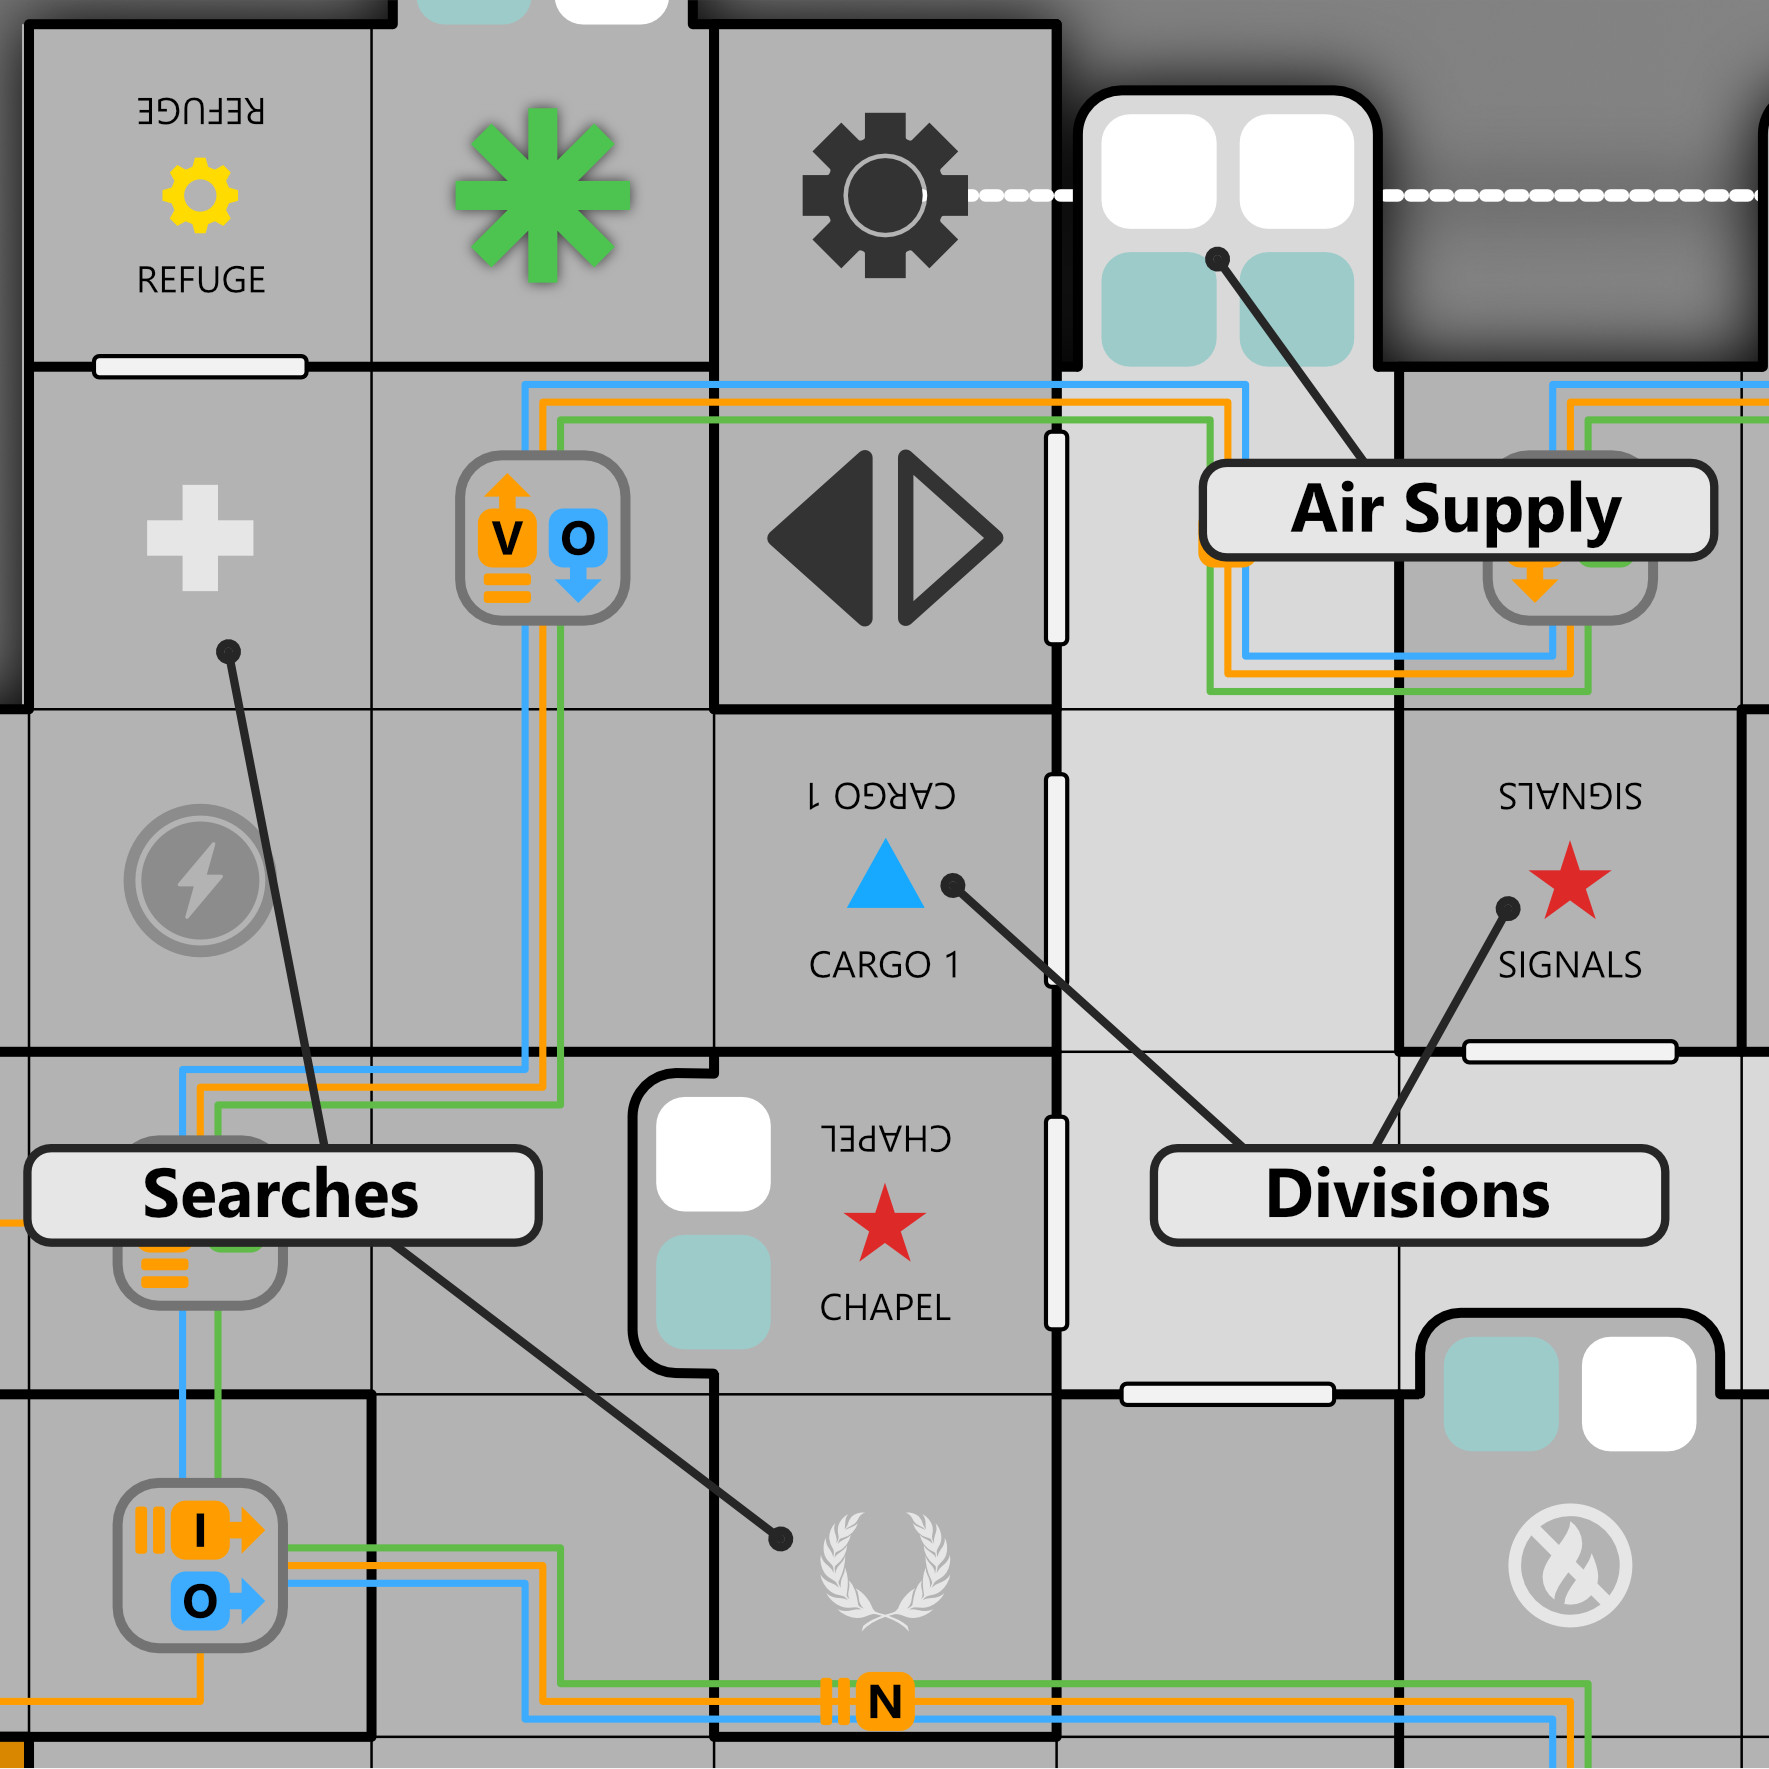
Air Supply indicators show the quality of the air in a section. At the moment the air on the ship is sweet and fresh. If this changes, colored atmospheric cubes are added to cover these squares. The three atmospheric cubes are Vapor (green), Freon (blue) and Other (black). We will explore this further in later tutorials.
All sections feature a Division Icon. These reflect the activities associated with the section and the crew members who are most likely to be found there. There are five divisions on the Riga, namely Command, Tactical, Science, Engineering and Technical. Cargo 1 is the responsibility of the Technical division. Signals is part of Command.
The white shapes are Search Icons. These indicate the type of items you can expect to find there. There are six types of Search Icon, namely Weapons, Tools, Extinguishers, Medical, Successes and Robots. The Search Icon in Cargo 1 is Medical. Perhaps there are a lot of accidents! Just a little synthetic humour. Forgive me. I forgot that you are assigned to Technical division. I am sure you will be fine.
Ship - Details
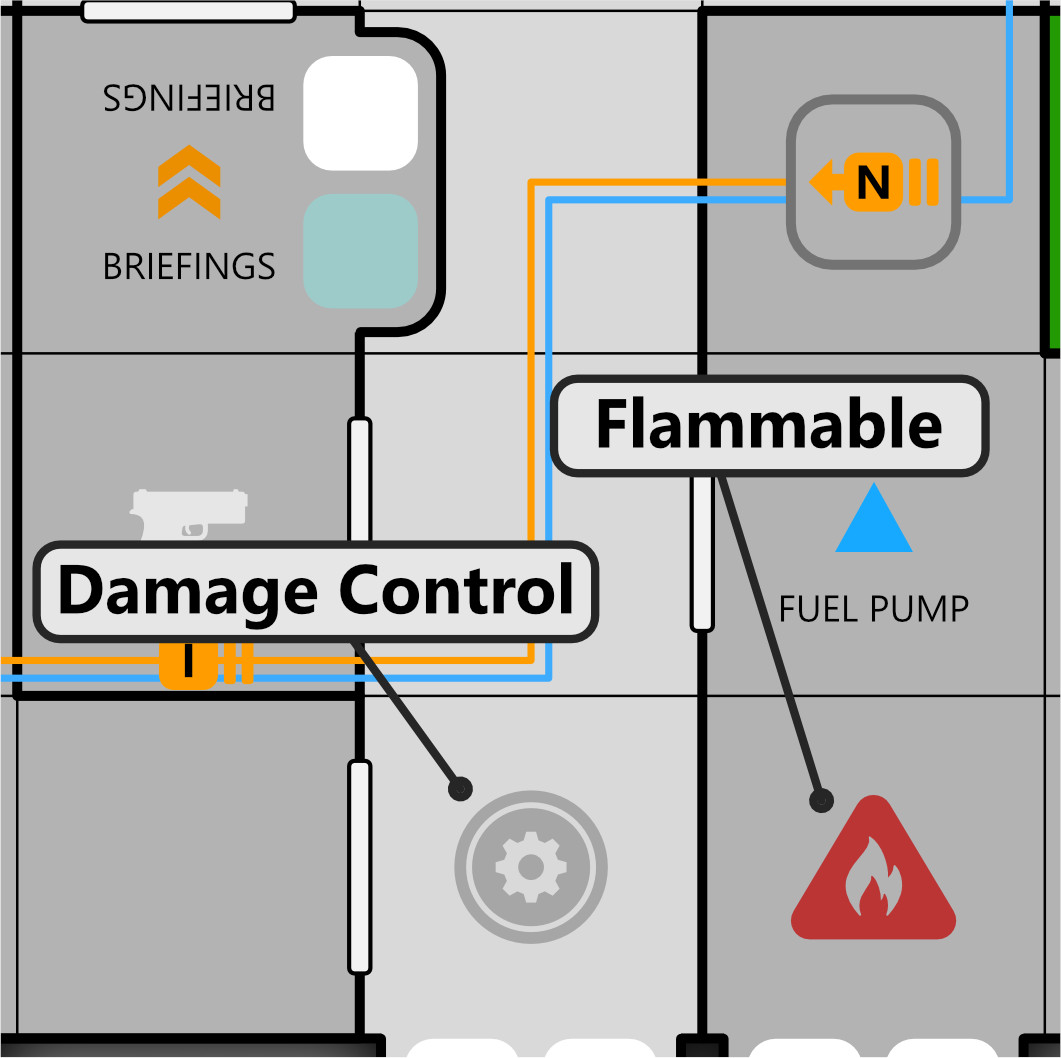
Damage Control Pods are located throughout the ship. These areas contain retractable hoses, fixed rail robots and manual controls for localized functions to help fight fires and effect repairs. Any crew member benefits from these if they are in the tile itself or an adjacent tile. The icon shown on a damage control pod indicates how it is equipped.
There are 4 types of damage, namely Science, Electrical, Mechanical and Upkeep. These reflect the diverse reasons things break, different types of fires and the varied approaches to fixing or extinguishing them. You would not for example fix a circuit board with a hammer or put out an oil fire with water.
The pod outside the Fuel Pump is equipped for mechanical damage control. It’s hoses are filled with foam and it’s fixed rail robots are equipped with power tools.
Some tiles on the ship are Flammable. If a fire takes hold here, the consequences are likely to be serious. The Fuel Pump has one such tile. Do not ignore fires in the Fuel Pump!
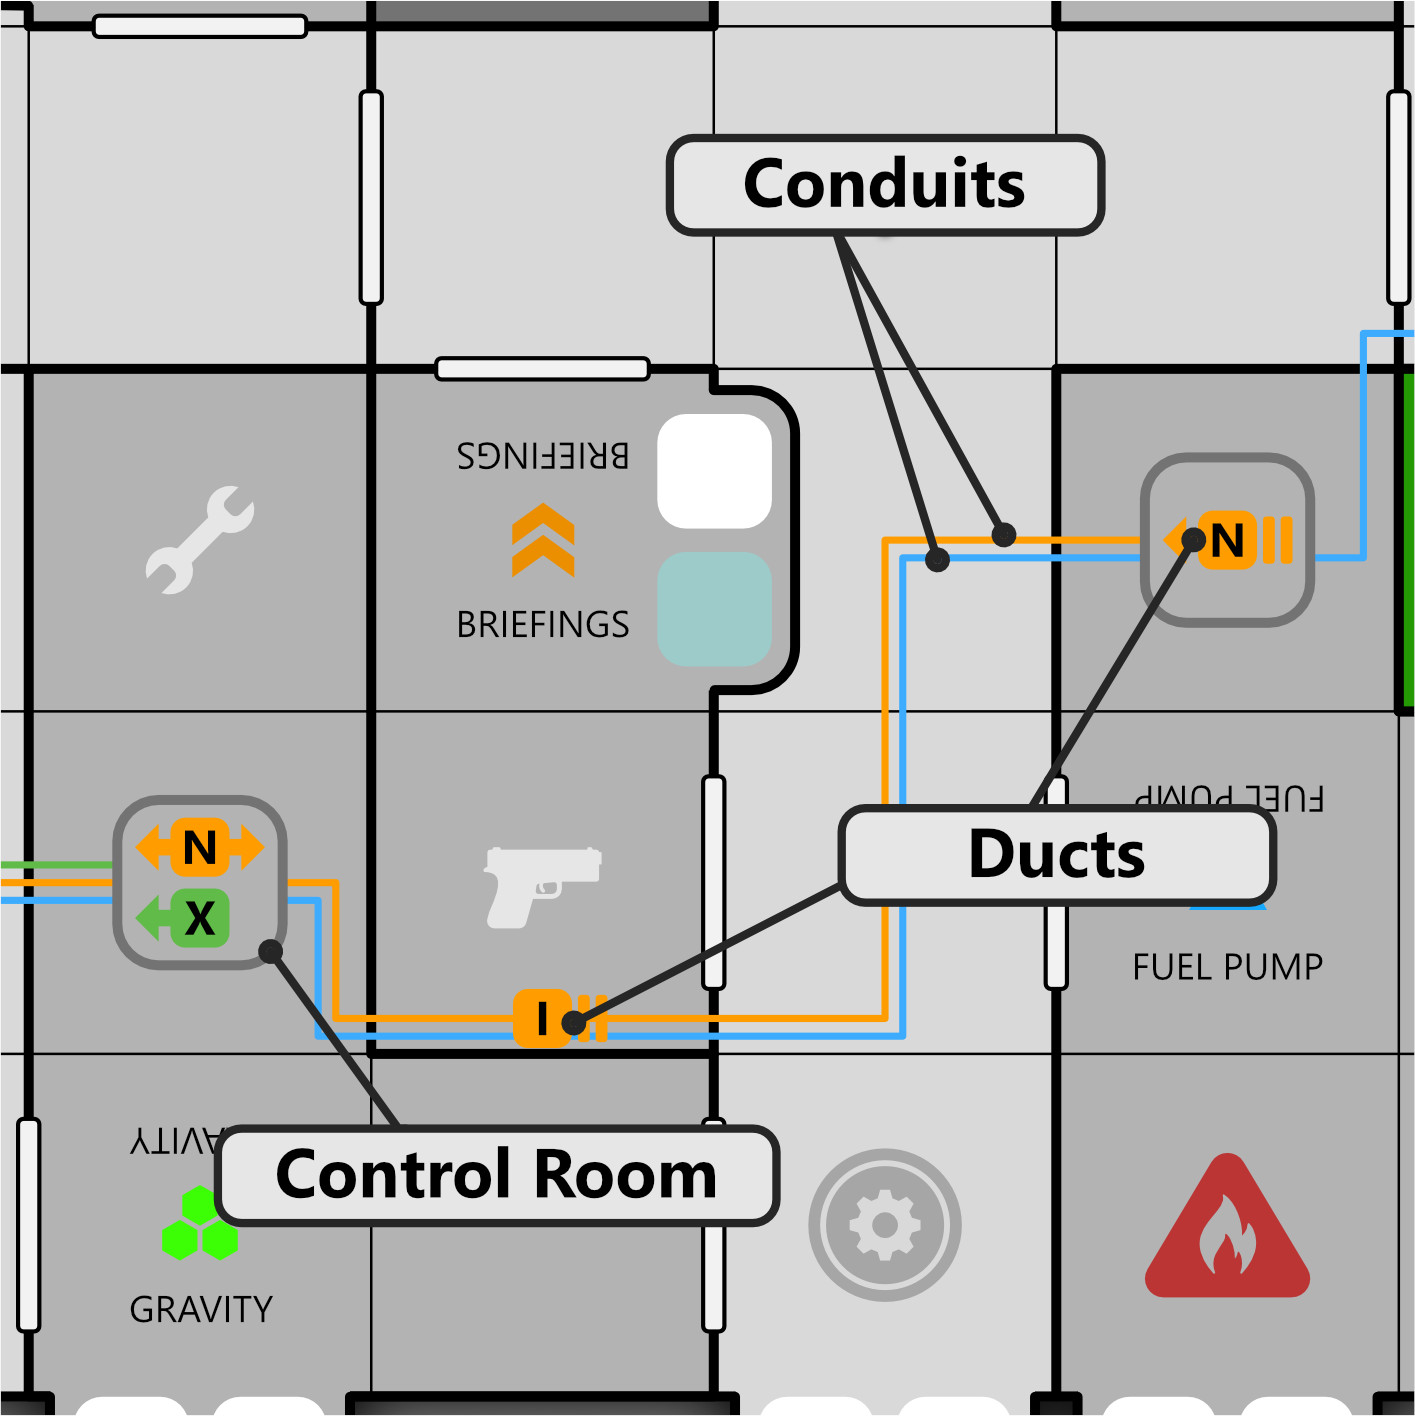
The colored lines are Conduits. They are the arteries of the ship, carrying resources where they are needed. There are 3 types of Conduit, namely Fuel (green), Freon (blue) and Plasma (orange). Conduits burrow between decks and bulkheads, emerging to feed ship systems and facilitate maintenance. Where they are exposed like this they are called Ducts. Each deck has a number of different conduits. These are identified alphabetically on relevant ducts.
The ship is operated from 48 Control Rooms which each relate to a unique ship system. Control rooms contain the equipment needed to operate the system. Any conduits supplying the system form ducts in its control room. The Gravity control room has two ducts; one for fuel and one for plasma. The fuel and plasma used by the Gravity ship system are supplied by Fuel Conduit X and Plasma Conduit N.
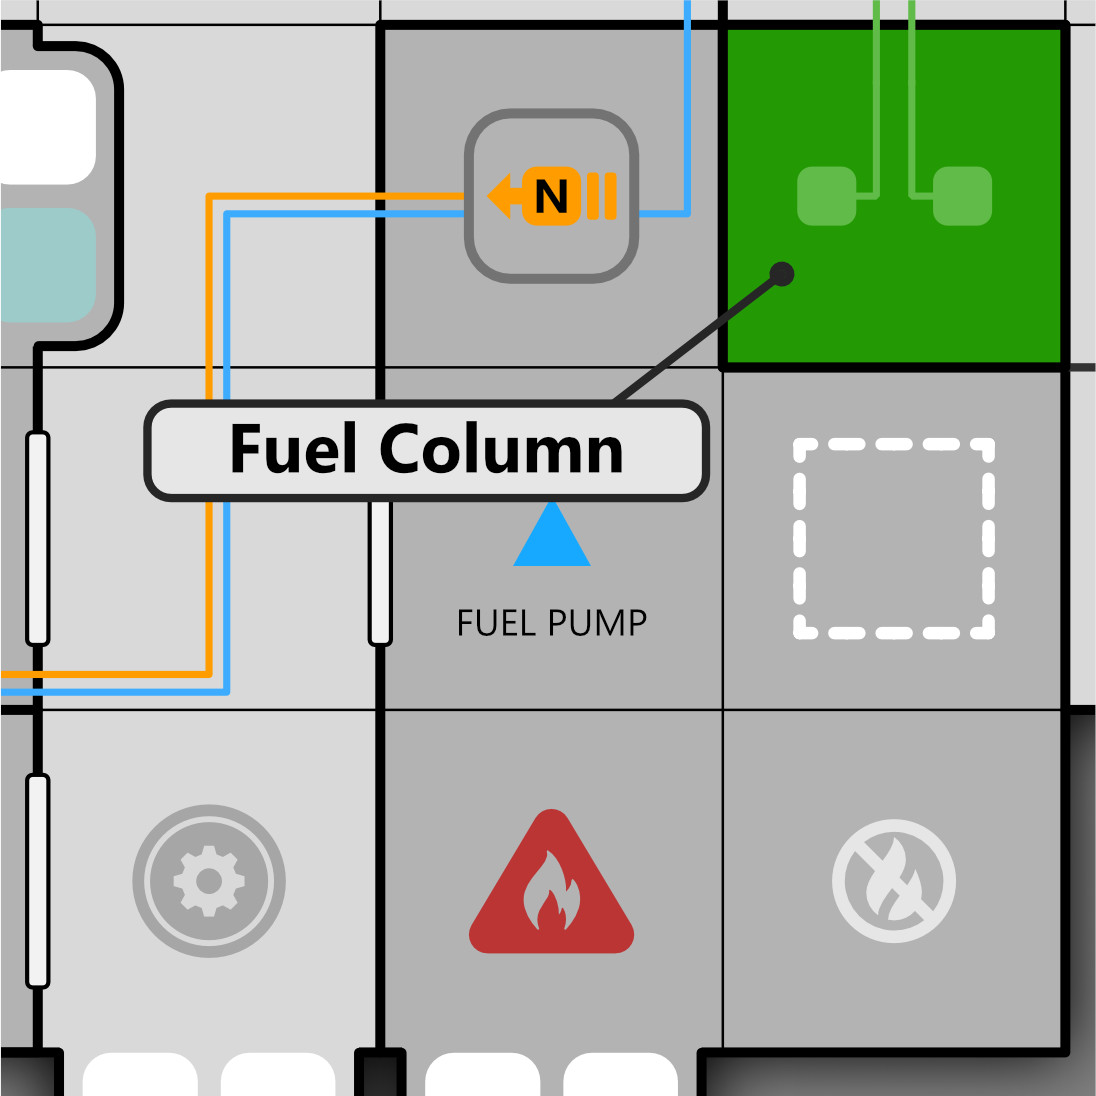
Arrows on ducts show the direction of origin for the conduit. They indicate where the contents of the conduit are coming from. Plasma conduits form loops so they may point in both directions. If you follow Fuel Conduit X in the direction shown it will take you all the way to the ship’s Fuel Column.
The Riga has 4 Columns. These are the sources from which fuel, freon and plasma originate. Refer to the image shown to locate the Fuel Column. If you examine the Ship Map you will see the Fuel Column is in the same tile on both decks. This is because it is the same thing; a huge vertical tank of fuel. The Riga has a fuel tank, a coolant tank and two plasma reactors. Each column appears on both decks and feeds two conduits per deck.
If you have been inspecting the ship map, you may have observed that the same letters are used to identify conduits on both decks. This is for simplicity’s sake. Conduits only affect the deck they are on. Fuel Conduit X on Deck 1 is a different conduit to Fuel Conduit X on Deck 2.
If you are located in a control room you can operate the system it relates to. You do not need to worry about conduits and columns and ducts to do this. Just punch a few buttons and the ship itself will do the hard work. Go ahead to Gravity and try it out. Yes, I am joking. The Chief Engineer would not be amused. We will come back to conduits, columns and ducts in a later tutorial. For now, it only matters that you know what they are.
Transit
Use the Transit system to move quickly around the ship. The system consists of elevator and railpod tiles which join together to form networks.
A Transit Network is any number of transit tiles connected by adjacency. In addition to the normal rule of adjacency (horizontal or diagonal), Transit Tiles are adjacent if they are located directly above or beneath each other.
Elevators use internal shafts to connect vertically between decks. You can ride an elevator up or down to arrive in the elevator tile positioned in the same place on the higher or lower deck.
Railpods travel outside the ship on rails, moving between two platforms. Follow the dotted tracks to see where a railpod goes.
There are three Transit networks on the Riga. Refer to the image to identify them. The ship map has been dimmed to allow the networks to be highlighted in red, green and blue. As you can see, all three networks consist of elevators and railpods. The latter are perfectly safe. That reminds me. Take your radiation pills. This is a mandatory daily requirement while aboard the Riga.
It usually costs one action to move from one tile to another. By contrast, it costs one action to enter a transit tile and then one more action to leave it from any tile on the same network. However, you cannot end your turn on a network. If you do not have enough actions to leave a network, you may not enter it.
Refer to the image to see an example of transit movement. Making this journey on foot would cost 14 actions. By using the Transit Network it costs us only 2.
All elevators are equipped with ladders. If Transit is not functioning you may enter an elevator and leave the elevator directly above or below it at the cost of 5 actions. You must still have enough actions to enter and leave the network. Railpod tiles cannot be entered if the Transit system is not working.
Summary
In this tutorial we were introduced to the map and standees. We briefly examined the status display. We should now be able to identify the following features on the ship map.
If you want to revisit any of these items, just click on them to return to them now. You can always come back here later for your celebratory cup of coffee. Congratulations on completing your induction!
